One of the most important aspects to consider when working with Spring Boot
and JPA (Java Persistence API) is how data related to entities are fetched
from the database. "Eager" and "Lazy" fetching are two common strategies for
fetching related entities. In this blog post, we'll look at eager and lazy
fetch types, how they differ, and when to use each.
Let's start. 💪
1. What is Eager and Lazy loading
We are actually associating two or more entities using
One-To-One/One-To-Many/Many-To-Many relationships, and these
relationships are reflected at the database level using an ORM framework (such
as Hibernate). ORM framework connects these two related entities with primary
and foreign keys and retrieves data from these two related tables with primary
and foreign keys.
So, by using the fetch type, we tell Hibernate how to retrieve data from the
two related tables. There are two types of fetch: EAGER and
LAZY. We used fetch type LAZY in the
One-To-Many tutorial:
@OneToMany(fetch = FetchType.LAZY, cascade = CascadeType.ALL)
FetchType.LAZY Hibernate will load the Owner first, then the Blogs ON
DEMAND (based on the previous tutorial relationship). FetchType.EAGER indicates that Hibernate will load both related
entities at the same time.
2. Create a Spring Boot Application
We will use Spring Initializr to create a new Spring Boot project, which will generate a basic
structure for our Spring Boot project. The following dependencies have
been added:
- Spring Boot DevTools - necessary development tools
- Spring Web - for Spring MVC and embedded Tomcat that will run the Spring Boot application
- Spring Data JPA - Java Persistence API
- MySQL Driver - JDBC driver for MySQL (for other DB you have to choose that dependency for that DB)
Then, to download the project zip file, click GENERATE. Unzip the
zip archive. Import the project as a Maven project into Eclipse/STS.
3. Connect to the Database
We'll put the connection information in the application because we're
using MySQL as our database. Hibernate will use this information to
connect to the database as the application.properties file has a name/value pair. The connection information is described in the following
snippet:
Here, we've set datasource.url to the URL of our JDBC connection. The database credentials are
mentioned in datasource.user and datasource.password.
Spring Boot can gather the necessary information about the database from
the connection URL, so it is not necessary to specify datasource.driver-class-name. However, we will be safer if we specify the driver-class-name.
When the application is running, jpa.show-sql displays Hibernate SQL queries in the console, jpa.hibernate.ddl-auto is set to update, which updates the database schema every time we restart
the application, and hibernate.dialect indicates which database dialect we are using.
👉 To demonstrate this tutorial, we will use two
entities: Publisher and Book. We establish a
One-To-Many relationship between these two entities using
the @OneToMany annotation, along with the fetch types.
4. Entities
Make a package called entity and create
a Book class in it. The code snippet is:
@Entity
@Table(name = "BOOK_DETAILS")
public class Book {

    @Id
    @GeneratedValue(strategy = GenerationType.IDENTITY)
    @Column(name = "ID")
    private int id;

    @Column(name = "book_name")
    private String bookName;

    @Column(name = "author_name")
    private String authorName;

    @Column(name = "year_of_published")
    private String yearOfPublished;

    @Column(name = "category")
    private String category;

    public Book() { }

    public Book(String bookName, String authorName, String yearOfPublished,
    						String category) {
        this.bookName = bookName;
        this.authorName = authorName;
        this.yearOfPublished = yearOfPublished;
        this.category = category;
    }

    public int getId() { return id; }
    public void setId(int id) { this.id = id; }

    public String getBookName() { return bookName; }
    public void setBookName(String bookName) { this.bookName = bookName; }

    public String getAuthorName() { return authorName; }
    public void setAuthorName(String authorName) { this.authorName = authorName; }

    public String getYearOfPublished() { return yearOfPublished; }
    public void setYearOfPublished(String yearOfPublished) {  this.yearOfPublished = yearOfPublished; }

    public String getCategory() { return category; }
    public void setCategory(String category) { this.category = category; }

    @Override
    public String toString() {
        return "Book{" + "id=" + id + ", bookName='" + bookName + '\'' + ", authorName='" + authorName + '\'' +
                ", yearOfPublished='" + yearOfPublished + '\'' + ", category='" + category + '\'' +'}';
    }
}
Book entity contains some private properties with some getter and
setter methods with a parameterized constructor and an overridden toString()
method.
and create the Publisher class in the
entity package:
@Entity
@Table(name = "PUBLISHER_DETAILS")
public class Publisher {

    @Id
    @GeneratedValue(strategy = GenerationType.IDENTITY)
    @Column(name = "ID")
    private int id;

    @Column(name = "publisher_name")
    private String publisherName;

    @Column(name = "year_of_established")
    private String yearOfEstablished;

    @Column(name = "address")
    private String address;

    @OneToMany(fetch = FetchType.EAGER, mappedBy = "publisher",
            cascade = {CascadeType.PERSIST, CascadeType.MERGE, CascadeType.DETACH, CascadeType.REFRESH})
    private List<Book> bookList;

    public Publisher() { }

    public Publisher(String publisherName, String yearOfEstablished, String address) {
        this.publisherName = publisherName;
        this.yearOfEstablished = yearOfEstablished;
        this.address = address;
    }

    public int getId() { return id; }
    public void setId(int id) { this.id = id; }

    public String getPublisherName() { return publisherName; }
    public void setPublisherName(String publisherName) { this.publisherName = publisherName; }

    public String getYearOfEstablished() { return yearOfEstablished; }
    public void setYearOfEstablished(String yearOfEstablished) { this.yearOfEstablished = yearOfEstablished; }

    public String getAddress() { return address; }
    public void setAddress(String address) { this.address = address; }

    public List<Book> getBookList() { return bookList; }
    public void setBookList(List<Book> bookList) { this.bookList = bookList; }

    @Override
    public String toString() {
        return "Publisher{" + "id=" + id + ", publisherName='" + publisherName + '\'' +
                ", yearOfEstablished='" + yearOfEstablished + '\'' + ", address='" + address + '\'' + '}';
    }
}
👉 We will first fetch data with FetchType.EAGER, then set
FetchType.LAZY by modifying the Publisher entity, and then fetching the
data again.
5. Repositories
The repository in Spring Boot is the data access layer that allows us to
interact with our real database for operations like insert, update, and
delete using Spring Data JPA. We have significantly reduced the number of boilerplate codes required
to perform database operations as our PublisherRepository and BookRepository extend JpaRepository.
Create a package called repository. Create the
PublisherRepository interface in it and include the following
code snippet:
public interface PublisherRepository extends JpaRepository<Publisher,Integer> {
}
and create the BookRepository interface in
the repository package:
public interface BookRepository extends JpaRepository<Book, Integer> {
}
6. Controllers
A controller is a class that has one or more public methods. Controllers
are typically placed in the Controller directory. If a class is annotated
with @Controller or @RestController in Spring Boot, it will serve as a controller, and its public methods
will be exposed as HTTP endpoints if they are annotated with @PostMapping or @GetMapping.
As a result, an HTTP GET request to http://localhost:PORT/method-name invokes the @GetMapping method of the ExampleController class.
Create a package called the controller and create a PublisherController
class in it. The PublisherController has two methods: one for saving
the Publisher with Books and another for retrieving Publisher details with
Books by id. We injected the PublisherRepository into our controller
using the @Autowired annotation. The following is the code:
@RestController
@RequestMapping("/publisher")
public class PublisherController {

    @Autowired
    private PublisherRepository publisherRepository;

    @PostMapping("/savePublisher")
    public String savePublisher(@RequestBody Publisher publisher) {
        System.out.println("Publisher save start...");

        Publisher publisherOut = publisherRepository.save(publisher);
        System.out.println("Publisher :: " + publisherOut.toString());

        System.out.println("Publisher save ends...");
        return "Publisher saved!!!";
    }

    @GetMapping("/getPublisher/{id}")
    public String getPublisher(@PathVariable(name = "id") String id) {
        System.out.println("Publisher fetch start...");

        Publisher publisherOut = publisherRepository.getById(Integer.valueOf(id));
        System.out.println("Publisher details :: " + publisherOut.toString());
        System.out.println("Books :: " + publisherOut.getBookList());

        System.out.println("Publisher fetch ends...");
        return "Publisher fetched!!!";
    }
}
7. Run the Project
To run the project in Visual Studio Code, follow these steps:
- Open SpringbootfetchtypeApplication.java.
- Click on Run to run the Java program.
To run the project in Eclipse, follow these steps:
- Right-click on SpringbootfetchtypeApplication.java.
- Then choose Run As, then click on Spring Boot App.
Because we did not specify a port in the application.properties file, our project will run on port 8080, and the default URL to access any REST API in this project
is http://localhost:8080/. Because our project runs on our local machine, we used localhost. If
your project is running on a remote server or in EC2, you must use the
remote server's or EC2's IP address or the elastic IP address.
8. Testing of Fetch Types
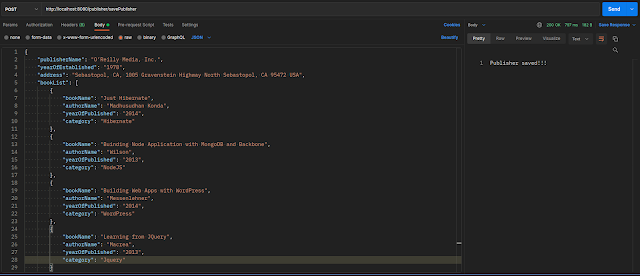
👉 CALL /savePublisher
To save a publisher with a list of books, we call this URL in the Postman:
http://localhost:8080/publisher/savePublisher
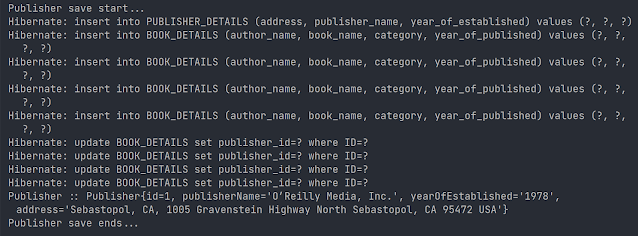
The audit log at the console (Eclipse/STS) says Publisher with Books is saved
successfully:
👉 CALL /getPublisher/{id}
To fetch Publisher with Books details with an id value of 1 in the Postman,
we use the following URL:
http://localhost:8080/publisher/getPublisher/1
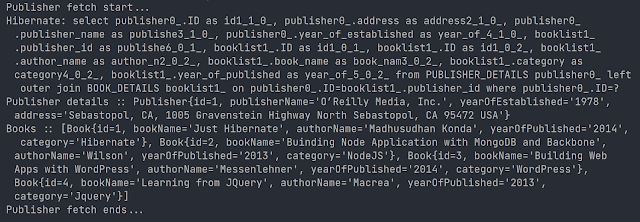
The audit log at the console says Publisher with Books is fetched
successfully:
Hibernate generates a SELECT SQL statement by joining
PUBLISHER_DEAILS (Publisher entity) with BOOK_DETAILS (Book
entity) to fetch a list of Books associated with the Publisher because we set
FetchType.EAGER in @OneToMany annotation in the Publisher
entity. We have just saved four books, and those four books have been
retrieved. However, in the real world, a renowned Publisher may publish more
than a thousand Books, if not more, so retrieving all associated entity data
at once is bad practice.
👉 Change to FetchType.LAZY
Let us look at the benefits of using FetchType.LAZY. We will simply
change the fetch type to FetchType.LAZY in the
@OneToMany annotation in the Publisher entity, and the rest of the code
will remain unchanged. It's right here:
👉 CALL /getPublisher/{id}
Again, we call /getPublisher/id (no change in this method) in Postman
to fetch Publisher with Books details with an id value of 1 and see the audit
log in the console:
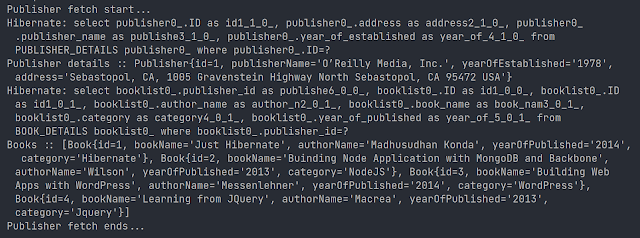
Hibernate does not generate a SELECT SQL statement by joining
PUBLISHER_DEAILS and BOOK_DETAILS, as shown by
FetchType.LAZY, but rather two separate SELECT SQL statements, one for
PUBLISHER_DEAILS (Publisher entity) and one for
BOOK_DETAILS (Book entity). As a result,
data from associated entities is retrieved SEPARATELY rather than by
JOINING.
👉 Again FetchType.EAGER
Update the fetch type to FetchType.EAGER once more in the
@OneToMany annotation in the Publisher entity, and the rest of
the code will remain unchanged. It's right here:
and comment on the line that prints the list of
Books (System.out.println("Books :: " + publisherOut.getBookList());) in the getPublisher() method as:
👉 CALL /getPublisher/{id}
Now call /getPublisher/{id} to fetch Publisher with
Books details with an id value of 1 in the Postman and see the audit
log in the console:
As we can see, we are no longer retrieving the list of Books associated with
the Publisher, but Hibernate is still generating a SELECT SQL statement by
joining PUBLISHER_DEAL with BOOK_DETAILS. As a result,
the FetchType.EAGER will always JOIN the associated entity's data.
👉 Load data on DEMAND
Update the fetch type to FetchType.LAZY once more in the
@OneToMany annotation in the Publisher entity, and the rest of the code
will remain unchanged. It's right here:
and keep the comment on the line that prints the list of
Books [System.out.println("Books :: " + publisherOut.getBookList());] in the getPublisher() method as:
👉 CALL /getPublisher/{id}
Now, in Postman, call /getPublisher/id to retrieve Publisher with Books
details with an id value of 1 and view the audit log in the console:
As a result, FetchType.LAZY retrieves only the Publisher details via a
simple SELECT SQL statement without joining and does not retrieve a list of
Books. This implies FetchType.LAZY obtains data ON DEMAND.
9. Conclusion
Choosing the appropriate fetch type in Spring Boot applications that use JPA
is critical for optimizing performance and resource utilization. Understanding
the distinctions between eager and lazy fetching allows you to make informed
decisions when designing entity relationships. Whether you use eager or lazy
fetching, you should always consider your application's usage patterns, data
volume, and performance requirements.
FetchType.EAGER is the default fetch type for @OneToOne.
FetchType for @OneToMany is EAGER.LAZY and
FetchType.LAZY is for @ManyToMany.
You can download the
source code.
Happy coding!!! 😊


No comments:
Post a Comment