Showing posts with label Hibernate. Show all posts

Sunday, October 16, 2022

Spring MVC CRUD Web Application Using With Java Configuration

JAVA,Dispatcher Servlet,Spring Framework,spring boot,programming,software development,technology
In this tutorial, we will build a simple CRUD (Create, Read, Update, and Delete) application using Spring MVC, Hibernate, and JSP with Java configuration - NO XML configuration. 

Hibernate is a very popular Object Relational Mapping (ORM) tool. Using Hibernate, we can automate the process of mapping the POJO (plain old Java object) to a database table, saving object data into the database table, and then converting them back into Java objects again by reading data from the database tables. To interact with relational databases, Hibernate has implemented JAVA Persistence API (JPA) and uses it for data manipulation.

Create Maven project

So, first, we will create a Maven project. To create a project in Eclipse, click on the File menu, then choose NewMaven Project. Then choose project location and click Next.
Now enter Group Id and Artifact Id and select packaging type as war (Web Archive) as shown:
JAVA,Dispatcher Servlet,Spring Framework,Spring Filter,Spring WebMVC,ViewResolver,Spring Security,InternalResourceViewResolver

Click Finish to create the project.

POM.XML

Here is our pom.xml of our Maven project for this tutorial:
<project xmlns="http://maven.apache.org/POM/4.0.0" xmlns:xsi="http://www.w3.org/2001/XMLSchema-instance" xsi:schemaLocation="http://maven.apache.org/POM/4.0.0 https://maven.apache.org/xsd/maven-4.0.0.xsd">
	<modelVersion>4.0.0</modelVersion>
	<groupId>com.raven</groupId>
	<artifactId>spring-mvc-web-app-hibernate-java-config</artifactId>
	<version>1.0.0-SNAPSHOT</version>
	<packaging>war</packaging>
	<name>spring-mvc-web-app-hibernate-java-config</name>
	<description>Spring MVC Web application with Hibernate using JAVA configurations</description>
	<properties>
		<springframework.version>5.3.21</springframework.version>
		<hibernate.version>5.6.11.Final</hibernate.version>
		<maven.compiler.source>11</maven.compiler.source>
		<maven.compiler.target>11</maven.compiler.target>
	</properties>
	<dependencies>
		<!-- Spring MVC support -->
		<dependency>
			<groupId>org.springframework</groupId>
			<artifactId>spring-webmvc</artifactId>
			<version>${springframework.version}</version>
		</dependency>
		<!-- Spring Transactions -->
		<dependency>
			<groupId>org.springframework</groupId>
			<artifactId>spring-tx</artifactId>
			<version>${springframework.version}</version>
		</dependency>
		<!-- Spring ORM -->
		<dependency>
			<groupId>org.springframework</groupId>
			<artifactId>spring-orm</artifactId>
			<version>${springframework.version}</version>
		</dependency>
		<!-- Hibernate Core -->
		<dependency>
			<groupId>org.hibernate</groupId>
			<artifactId>hibernate-core</artifactId>
			<version>${hibernate.version}</version>
		</dependency>
		<dependency>
			<groupId>org.hibernate</groupId>
			<artifactId>hibernate-entitymanager</artifactId>
			<version>${hibernate.version}</version>
		</dependency>
		<!-- https://mvnrepository.com/artifact/org.apache.commons/commons-dbcp2 -->
		<dependency>
			<groupId>org.apache.commons</groupId>
			<artifactId>commons-dbcp2</artifactId>
			<version>2.9.0</version>
		</dependency>
		<!-- Servlet support -->
		<dependency>
			<groupId>javax.servlet</groupId>
			<artifactId>javax.servlet-api</artifactId>
			<version>4.0.1</version>
		</dependency>
		<!-- JSP support -->
		<dependency>
			<groupId>javax.servlet.jsp</groupId>
			<artifactId>javax.servlet.jsp-api</artifactId>
			<version>2.3.3</version>
		</dependency>
		<!-- JSTL support -->
		<dependency>
			<groupId>javax.servlet</groupId>
			<artifactId>jstl</artifactId>
			<version>1.2</version>
		</dependency>
		<dependency>
			<groupId>taglibs</groupId>
			<artifactId>standard</artifactId>
			<version>1.1.2</version>
		</dependency>
		<!-- https://mvnrepository.com/artifact/mysql/mysql-connector-java -->
		<dependency>
			<groupId>mysql</groupId>
			<artifactId>mysql-connector-java</artifactId>
			<version>8.0.29</version>
			<!--<version>5.1.47</version>-->
		</dependency>
		<dependency>
			<groupId>junit</groupId>
			<artifactId>junit</artifactId>
			<version>4.13.1</version>
			<scope>test</scope>
		</dependency>
	</dependencies>
	<build>
		<finalName>spring-mvc-web-app-hibernate-java-config</finalName>
		<pluginManagement>
			<plugins>
				<plugin>
					<groupId>org.apache.maven.plugins</groupId>
					<artifactId>maven-war-plugin</artifactId>
					<version>3.3.2</version>
				</plugin>
			</plugins>
		</pluginManagement>
	</build>
</project>
Here, the Spring Framework version is 5.3.21 and Hibernate is 6.1.1.Final. We have added Spring MVC, Servlet and JSP, ORM, Hibernate Core, Transaction, Spring JDBC, and MySQL connector for Java-related dependencies in our pom.xml. As we are using war as a packaging type, that is why we use the maven-war-plugin to build the application.

Connect to Database

In application-db.properties file under resource directory, we've configured Jdbc connection properties to connect MySQL database, spring_mvc_web_hibernate:
### JDBC connection properties
jdbc.driver=com.mysql.cj.jdbc.Driver
jdbc.url=jdbc:mysql://172.17.0.2:3306/spring_mvc_web_hibernate?useSSL=false
jdbc.username=root
jdbc.password=admin@123

### Hibernate properties
hibernate.dialect=org.hibernate.dialect.MySQL5InnoDBDialect
hibernate.show_sql=true
hibernate.hbm2ddl.auto=update
hibernate.format_sql=true
hiberante.packagesToScan=com.raven.mvcwebapp.entity

### Connection pool properties
dbcp2.initial-size=50
dbcp2.max-idle=50
dbcp2.default-query-timeout=10000
dbcp2.default-auto-commit=true
Here, we've also mentioned Hibernate configurations along with connection pool properties. The hibernate.show_sql is used to show Hibernate SQL queries in the console when the application is running. hibernate.ddl-auto is set to update - this will update the database tables every time we restart the application. hibernate.dialect indicates which database dialect we are using. In hiberante.packagesToScan we've set our Entity (POJO) package name, so Hibernate will create database tables with all the entities in this package. 

Spring MVC Configuration

Create ApplicationConfiguration class in the config package and this class will act as Spring MVC configuration. Here we are going to configure the ViewResolver:
package com.raven.webmvcapp.config;

import org.springframework.context.annotation.Bean;
import org.springframework.context.annotation.ComponentScan;
import org.springframework.context.annotation.Configuration;
import org.springframework.web.servlet.ViewResolver;
import org.springframework.web.servlet.config.annotation.EnableWebMvc;
import org.springframework.web.servlet.view.InternalResourceViewResolver;

@Configuration
@EnableWebMvc
@ComponentScan(basePackages = "com.raven.webmvcapp")
public class ApplicationConfiguration {

	@Bean
	public ViewResolver viewResolver() {
		InternalResourceViewResolver resourceViewResolver = new InternalResourceViewResolver();
		resourceViewResolver.setPrefix("/WEB-INF/view/");
		resourceViewResolver.setSuffix(".jsp");

		return resourceViewResolver;
	}
}
We are using JSP as our view technology and keeping our view files in "/WEB-INF/view/".

Based on the URL, application control goes to a particular controller and then the controller returns a logical view name. Then it is the view resolver's job to resolve the logical view name to the actual physical resource. 

The InternalResourceViewResolver is an implementation of the ViewResolver interface. Using setPrefix() and setSuffix(), the view resolver maps logical view names to actual physical views.

As our prefix is "/WEB-INF/view/" and suffix is ".jsp", and if the logical view name is "home", then InternalResourceViewResolver will resolve this as "/WEB-INF/home.jsp".

Initialize Dispatcher Servlet

Now we have to initialize the Spring dispatcher servlet. To do this we will create ApplicationDispatherServletInitializer class in the config package which will extend AbstractAnnotationConfigDispatcherServletInitializer class:
package com.raven.webmvcapp.config;

import org.springframework.web.servlet.support.AbstractAnnotationConfigDispatcherServletInitializer;

public class ApplicationDispatherServletInitializer extends AbstractAnnotationConfigDispatcherServletInitializer {

	@Override
	protected Class<?>[] getRootConfigClasses() {
		// TODO Auto-generated method stub
		return null;
	}

	@Override
	protected Class<?>[] getServletConfigClasses() {
		// application configuration mapping
		return new Class[] { ApplicationConfiguration.class };
	}

	@Override
	protected String[] getServletMappings() {
		// servlet mapping
		return new String[] { "/" };
	}
}
The dispatcher servlet is responsible for forwarding/dispatching the request to the appropriate controller method. In this class, we need to configure our Spring MVC Java Configuration file. That is why we have registered previously created ApplicationConfiguration class in getServletConfigClasses() method.

Hibernate Configuration

Now we will write some Java code to integrate Hibernate SessionFactory in the Spring container. SessionFactory actually creates a Hibernate session by which we can perform any create, update, retrieve, or delete operations.
package com.raven.mvcwebapp.configuration;
// imports

@Configuration
@EnableTransactionManagement
@ComponentScan({ "com.raven.mvcwebapp.configuration" })
@PropertySource("classpath:application-db.properties")
public class HibernateConfiguration {
	@Autowired
	private Environment environment;

	@Bean
	public LocalSessionFactoryBean sessionFactory() {
		LocalSessionFactoryBean sessionFactory = new LocalSessionFactoryBean();
		sessionFactory.setDataSource(getDataSource());
		sessionFactory.setPackagesToScan(new String[] { "com.raven.mvcwebapp.entity" });
		sessionFactory.setHibernateProperties(hibernateProperties());
		return sessionFactory;
	}
	
	@Bean
	public DataSource getDataSource() {
		BasicDataSource dataSource = new BasicDataSource();
		dataSource.setDriverClassName(environment.getRequiredProperty("jdbc.driver"));
		dataSource.setUrl(environment.getRequiredProperty("jdbc.url"));
		dataSource.setUsername(environment.getRequiredProperty("jdbc.username"));
		dataSource.setPassword(environment.getRequiredProperty("jdbc.password"));
		return dataSource;
	}

	private Properties hibernateProperties() {
		Properties properties = new Properties();
		properties.put("hibernate.dialect", environment.getRequiredProperty("hibernate.dialect"));
		properties.put("hibernate.hbm2ddl.auto", environment.getRequiredProperty("hibernate.hbm2ddl.auto"));
		properties.put("hibernate.show_sql", environment.getRequiredProperty("hibernate.show_sql"));
		properties.put("hibernate.format_sql", environment.getRequiredProperty("hibernate.format_sql"));
		return properties;
	}

	@Bean
	@Autowired
	public HibernateTransactionManager transactionManager(SessionFactory s) {
		HibernateTransactionManager txManager = new HibernateTransactionManager();
		txManager.setSessionFactory(s);
		return txManager;
	}
}
Here we have used Apache Commons DBCP dependency to set up BasicDataSource by providing database connection properties. Then we have this datasource to set up LocalSessionFactoryBeanLocalSessionFactoryBean is a FactoryBean to create Hibernate SessionFactory. This way we can set up a Hibernate SessionFactory in a Spring application context; then this SessionFactory can be used in our application via dependency injection.

The SessionFactory is a heavyweight object; it is usually created during application start-up and kept for later use. The SessionFactory is a thread-safe object and is used by all the threads of an application.

Entity

Here is our Employee entity with some private properties with the getter and setter methods, a parameterized constructor, and an overridden toString() method.
Create EmployeeEntity class in entity package:
package com.raven.mvcwebapp.entity;
// imports ...

@Entity
@Table(name = "Employee")
public class EmployeeEntity {

	@Id
	@GeneratedValue(strategy = GenerationType.IDENTITY)
	@Column(name = "emp_id")
	private int empId;

	@Column(name = "first_name", length = 20)
	private String firstName = "";

	@Column(name = "last_name", length = 20)
	private String lastName = "";

	@Column(name = "gender", length = 8)
	private String gender = "";

	@Column(name = "phone_number", length = 12)
	private String phoneNumber = "";

	@Column(name = "email", length = 60)
	private String email = "";

	@Column(name = "country", length = 15)
	private String country = "";

	@Column(name = "job_title", length = 40)
	private String jobTitle = "";

	public EmployeeEntity() {
	}

	public EmployeeEntity(String firstName, String lastName, String gender, String phoneNumber, String email,
			String country, String jobTitle) {
		this.firstName = firstName;
		this.lastName = lastName;
		this.gender = gender;
		this.phoneNumber = phoneNumber;
		this.email = email;
		this.country = country;
		this.jobTitle = jobTitle;
	}

// getter and setter ...
// overriden toString() ...
}
By using @Entity annotation we make a plain Java class into a persistent class.

@Table annotation is for our database table with the name (Employee).

@Id annotation is used for defining the primary key (object identifier). In the EmployeeEntity class, the primary key is defined as empId variable.

We have added @GeneratedValue annotation to the empId variable. This annotation is used to specify what will be the strategy to generate the value of the primary key (emp_id). We have used GenerationType.IDENTITY to the primary key - this is the same as AUTO_INCREMENT of MySQL.

@Column annotation is used for defining column names along with some other attributes in the database table. If we want the column name of the database table to be different from that of the variable name, we must use this annotation.

Spring Data Repository

Create EmployeeRepository class under repository package:
package com.raven.mvcwebapp.repository;
// imports ...

@Repository
public class EmployeeRepository {

    @Autowired
    private SessionFactory sessionFactory;

    @Transactional
    public List<EmployeeEntity> getEmployeeEntities() {
        List<EmployeeEntity> employeeEntities = null;

        try {
            Session session = sessionFactory.getCurrentSession();

            // use entity class name - EmployeeEntity - with from
            employeeEntities = session.createQuery("from EmployeeEntity", EmployeeEntity.class).list();
        } catch (HibernateException exception) {
            exception.printStackTrace();
        }

        return employeeEntities;
    }

    @Transactional
    public EmployeeEntity getEmployee(int empId) {
        EmployeeEntity employeeEntity = null;

        try {
            Session session = sessionFactory.getCurrentSession();
            employeeEntity = session.get(EmployeeEntity.class, empId);
        } catch (HibernateException exception) {
            exception.printStackTrace();
        }
        return employeeEntity;
    }

    @Transactional
    public void saveEmployee(EmployeeEntity employeeEntity) {
        try {
            Session session = sessionFactory.getCurrentSession();
            session.saveOrUpdate(employeeEntity);
        } catch (HibernateException exception) {
            exception.printStackTrace();
        }
    }

    @Transactional
    public void deleteEmployee(int empId) {
        try {
            Session session = sessionFactory.getCurrentSession();
            Query query = session.createQuery("delete from EmployeeEntity where empId=:empid");
            query.setParameter("empid", empId);
            query.executeUpdate();
        } catch (HibernateException exception) {
            exception.printStackTrace();
        }
    }
}
Here you can see we have injected the SessionFactory that we had configured previously. Using this SessionFactory, we will do our CRUD operations on the database.

Using getEmployeeEntities(), we are fetching all employees from the DB table. Here we have used HQL (Hibernate Query Language) as our language to query the database. Using "from EmployeeEntity", we are selecting all the employee records from the DB table.

getEmployee(int empId) is used to fetch an employee's details using empId.

saveEmployee(EmployeeEntity employeeEntity) is used to save a new employee or update existing employee details.

Using deleteEmployee(int empId), we delete a particular employee from the DB.

Controller

Create a HomeController class in the controller package:
package com.raven.mvcwebapp.controller;
// imports ...

@Controller
@RequestMapping("/")
public class HomeController {

    @Autowired
    private EmployeeRepository employeeRepository;

    @RequestMapping(value = {"/", "/home"}, method = RequestMethod.GET)
    public String showHome(Model model) {
        List<EmployeeEntity> employeeEntities = employeeRepository.getEmployeeEntities();
        model.addAttribute("employees", employeeEntities);
        return "home";
    }

    @RequestMapping(value = "/showNewEmployeeForm", method = RequestMethod.GET)
    public String showNewEmployeeForm(Model model) {
        EmployeeEntity employeeEntity = new EmployeeEntity();
        model.addAttribute("employee", employeeEntity);
        model.addAttribute("countries", getCountries());

        return "newEmployeeForm";
    }

    @RequestMapping(value = "/saveEmployee", method = RequestMethod.POST)
    public String saveEmployee(@ModelAttribute("employee") EmployeeEntity employeeEntity) {
        employeeRepository.saveEmployee(employeeEntity);
        return "redirect:/home";
    }

    @RequestMapping(value = "/showEmployeeUpdateForm", method = RequestMethod.GET)
    public String showEmployeeUpdateForm(@RequestParam("empId") int empId, Model model) {
        EmployeeEntity employeeEntity = employeeRepository.getEmployee(empId);
        model.addAttribute("employee", employeeEntity);
        model.addAttribute("countries", getCountries());

        return "newEmployeeForm";
    }

    @RequestMapping(value = "/deleteEmployee", method = RequestMethod.GET)
    public String deleteEmployee(@RequestParam("empId") int empId) {
        employeeRepository.deleteEmployee(empId);

        return "redirect:/home";
    }

    private Map<String, String> getCountries() {
        Map<String, String> mapCountries = new LinkedHashMap<>();
        mapCountries.put("Canada", "Canada");
        mapCountries.put("Brazil", "Brazil");
        mapCountries.put("France", "France");
        mapCountries.put("Germany", "Germany");
        mapCountries.put("India", "India");
        mapCountries.put("Japan", "Japan");

        return mapCountries;
    }
}
We have annotated this class with the @Controller annotation to make it a Spring MVC controller. We have also injected EmployeeRepository for DB operations. 

We are using Spring Model as a container for our application data. We can put anything in the model - string, list, object, etc. Then in the view (JSP) page we can retrieve the data from the model and bind the data with the HTML controls.

showHome(Model model) is used to load our home page (home.jsp) whenever the application starts with an employee list. First, we fetched all the employees from the DB using the repository, then added them into the model with the attribute name employee. Now we access the employee list using this attribute name in our view (JSP) page.

showNewEmployeeForm(Model model) is used to show the new employee creation page. Here we have added two entities in the model - the first one, named employee, is an empty Employee entity, and the second one, named countries, is a list of countries.

saveEmployee(@ModelAttribute("employee") EmployeeEntity employeeEntity) is to save a new employee. This method will be called when we submit the newEmployeeForm.jsp view page and from that page, this method will receive an employee entity using the @ModelAttribute annotation. Then we save the entity using the repository saveEmployee() method.

So here @ModelAttribute annotation is used to get an entity with data from the view (JSP) page. 

showEmployeeUpdateForm(@RequestParam("empId") int empId, Model model) is used to open a view page with existing employee details. Using @RequestParam annotation we are acquiring the empId as a query parameter, then employee details are fetched using this empId and added these employee details in Spring Model to show in the JSP view page.

@RequestParam annotation is used to accept query parameters in the Controller from View.

Using deleteEmployee(@RequestParam("empId") int empId), we delete a particular employee. Using @RequestParam annotation we are acquiring the empId as a query parameter, then deleting the employee by the deleteEmployee(empId) method of the repository.  

Views

Now we will create our JSP view pages. The first one is for our application home. So create a home.jsp in /WEB-INF/view/ directory:
<%@ taglib prefix="form" uri="http://www.springframework.org/tags/form"%>
<%@ taglib prefix="c" uri="http://java.sun.com/jsp/jstl/core"%>
<%@ page language="java" contentType="text/html; charset=UTF-8" pageEncoding="UTF-8"%>
<!DOCTYPE html>
<html>
<head>
<meta charset="UTF-8">
<meta name="viewport" content="width=device-width, initial-scale=1">
<title>Home - Spring MVC CRUD Web Application</title>
<link rel="stylesheet" href="https://cdn.jsdelivr.net/npm/bootstrap@4.6.2/dist/css/bootstrap.min.css">
<link rel="stylesheet" href="https://stackpath.bootstrapcdn.com/font-awesome/4.7.0/css/font-awesome.css" />
<script src="https://cdn.jsdelivr.net/npm/jquery@3.5.1/dist/jquery.slim.min.js"></script>
<script src="https://cdn.jsdelivr.net/npm/popper.js@1.16.1/dist/umd/popper.min.js"></script>
<script src="https://cdn.jsdelivr.net/npm/bootstrap@4.6.2/dist/js/bootstrap.min.js"></script>
<style>
body { font-family: Arial, Helvetica, sans-serif; margin: 0; }
.header { padding: 2px; text-align: center; background: #1abc9c; color: white; font-size: 18px; }
.content { padding: 2px; }
</style>
</head>
<body>
	<div class="header">
		<h2>Spring MVC CRUD Web Application</h2>
		<p>Welcome to Spring MVC CRUD Web Application with Hibernate</p>
	</div>

	<div class="container-md themed-container" id="containers">
		<div class="row" style="padding: 8px;">
			<div class="col">
				<h3>Employee</h3>
			</div>
			<div class="col"></div>
			<div class="col" style="text-align: right;">
				<input type="button" class="btn btn-secondary" value="New Employee"
					onclick="window.location.href='showNewEmployeeForm'; return false;" />
			</div>
		</div>
		<c:if test="${not empty employees}">
			<table class="table table-hover">
				<thead>
					<tr>
						<th scope="col">#</th>
						<th scope="col">Name</th>
						<th scope="col">Gender</th>
						<th scope="col">Phone</th>
						<th scope="col">Job Title</th>
						<th scope="col">Country</th>
						<th scope="col">###</th>
					</tr>
				</thead>
				<tbody>
					<c:forEach items="${employees}" var="employee"
						varStatus="loopCounter">
						<!-- update link -->
						<c:url var="updateLink" value="/showEmployeeUpdateForm">
							<c:param name="empId" value="${employee.empId}"></c:param>
						</c:url>
						<c:url var="deleteLink" value="/deleteEmployee">
							<c:param name="empId" value="${employee.empId}"></c:param>
						</c:url>
						<tr>
							<th scope="row">${loopCounter.count}</th>
							<td><c:out value="${employee.firstName}" />&nbsp<c:out
									value="${employee.lastName}" /></td>
							<td><c:out value="${employee.gender}" /></td>
							<td><c:out value="${employee.phoneNumber}" /></td>
							<td><c:out value="${employee.jobTitle}" /></td>
							<td><c:out value="${employee.country}" /></td>
							<td>
							<a href="${updateLink}">Update</a>
							-
							<a href="${deleteLink}">Delete</a>
							</td>
						</tr>
					</c:forEach>
				</tbody>
			</table>
		</c:if>
	</div>
</body>
</html>
In this view page, we are showing the list of employees that we have in the DB. Here we get the list of employee objects - employees - from the Spring Model. Then using JSP form tags we are binding the employee data in an HTML table.

Here is our second view page that will be used to save a new employee and to update an existing employee. Create newEmployeeForm.jsp in /WEB-INF/view/ directory:
<%@ taglib prefix="form" uri="http://www.springframework.org/tags/form"%>
<%@ taglib prefix="c" uri="http://java.sun.com/jsp/jstl/core"%>
<%@ page language="java" contentType="text/html; charset=UTF-8" pageEncoding="UTF-8"%>
<!DOCTYPE html>
<html>
<head>
<meta charset="UTF-8">
<meta name="viewport" content="width=device-width, initial-scale=1">
<title>New Employee - Spring MVC CRUD Web Application</title>
<link rel="stylesheet" href="https://cdn.jsdelivr.net/npm/bootstrap@4.6.2/dist/css/bootstrap.min.css">
<link rel="stylesheet" href="https://stackpath.bootstrapcdn.com/font-awesome/4.7.0/css/font-awesome.css" />
<script src="https://cdn.jsdelivr.net/npm/jquery@3.5.1/dist/jquery.slim.min.js"></script>
<script src="https://cdn.jsdelivr.net/npm/popper.js@1.16.1/dist/umd/popper.min.js"></script>
<script src="https://cdn.jsdelivr.net/npm/bootstrap@4.6.2/dist/js/bootstrap.min.js"></script>
<style>
body { font-family: Arial, Helvetica, sans-serif; margin: 0; }
.header { padding: 2px; text-align: center; background: #1abc9c; color: white; font-size: 18px; }
.content { padding: 2px; }
</style>
</head>
<body>
	<div class="header">
		<h2>Spring MVC CRUD Web Application</h2>
		<p>Welcome to Spring MVC CRUD Web Application with Hibernate</p>
	</div>
	<div class="container-md themed-container" id="containers">
		<div class="row" style="padding: 8px;">
			<div class="col">
				<h3>New Employee</h3>
			</div>
		</div>
		<form:form action="saveEmployee" modelAttribute="employee"
			method="POST">
			<form:hidden path="empId" />
			<div class="form-group row">
				<label class="col-sm-2 col-form-label">First Name</label>
				<div class="col-sm-6">
					<form:input type="text" class="form-control" path="firstName" />
				</div>
			</div>
			<div class="form-group row">
				<label class="col-sm-2 col-form-label">Last Name</label>
				<div class="col-sm-6">
					<form:input type="text" class="form-control" path="lastName" />
				</div>
			</div>
			<div class="form-group row">
				<label class="col-sm-2 col-form-label">Gender</label>
				<div class="col-sm-6">
					<div class="custom-control custom-radio custom-control-inline">
						<form:radiobutton id="radioMale" path="gender" value="Male"
							class="custom-control-input" />
						<label class="custom-control-label" for="radioMale">Male</label>
					</div>
					<div class="custom-control custom-radio custom-control-inline">
						<form:radiobutton id="radioFemale" path="gender" value="Female"
							class="custom-control-input" />
						<label class="custom-control-label" for="radioFemale">Female</label>
					</div>
				</div>
			</div>
			<div class="form-group row">
				<label class="col-sm-2 col-form-label">Phone</label>
				<div class="col-sm-6">
					<form:input type="text" class="form-control" path="phoneNumber" />
				</div>
			</div>
			<div class="form-group row">
				<label class="col-sm-2 col-form-label">Email</label>
				<div class="col-sm-6">
					<form:input type="text" class="form-control" path="email" />
				</div>
			</div>
			<div class="form-group row">
				<label class="col-sm-2 col-form-label">Country</label>
				<div class="col-sm-6">
					<form:select path="country" class="form-control">
						<form:options items="${countries}" />
					</form:select>
				</div>
			</div>
			<div class="form-group row">
				<label class="col-sm-2 col-form-label">Job Title</label>
				<div class="col-sm-6">
					<form:input type="text" class="form-control" path="jobTitle" />
				</div>
			</div>
			<input type="submit" value="Submit" class="btn btn-success" />
		</form:form>
	</div>
</body>
</html>
The modelAttribute of <form></form> is employee which is attached to the @ModelAttribute of saveEmployee(@ModelAttribute("employee") EmployeeEntity employeeEntity) methods in the Controller.

The value of action attribute of <form></form> is saveEmployee which is the method name we have declared in our HomeController.java. So whenever we submit this form, Spring MVC will call saveEmployee(@ModelAttribute("employee") EmployeeEntity employeeEntity) the method. 

Test the Application

Now run the application and put this URL - http://localhost:8080/spring-mvc-web-app-hibernate-java-config/ in the browser:
JAVA,Dispatcher Servlet,Spring Framework,Spring Filter,Spring WebMVC,ViewResolver,Spring Security,InternalResourceViewResolver

New employee creation page:
JAVA,Dispatcher Servlet,Spring Framework,Spring Filter,Spring WebMVC,ViewResolver,Spring Security,InternalResourceViewResolver

Update an existing employee:
JAVA,Dispatcher Servlet,Spring Framework,Spring Filter,Spring WebMVC,ViewResolver,Spring Security,InternalResourceViewResolver

You can download the source code from here.
Happy coding!!! 😊
in

References:


Friday, June 10, 2022

ManyToMany Relationship In Spring Boot using Hibernate and Jpa

JAVA,Hibernate,Programming,Spring Boot,REST API,Software Development,Technology,JPA,ManyToMany
Combining JPA (Java Persistence API) with Hibernate as the underlying ORM (Object-Relational Mapping) framework allows for the establishment of a Many-To-Many relationship between entities. In this blog post, we'll look at how to use Hibernate and JPA to implement a Many-To-Many relationship in Spring Boot.

1. What is a Many-To-Many association

A Many-To-Many relationship exists when two entities are linked in such a way that one entity has many (collections) of the other entity and vice versa. Consider the relationship between a student and a teacher. Students are taught by many Teachers, and each Teacher has a class of many Students. Here's another example: Employees and Projects can have many-to-many relationships. In this case, an Employee may work on multiple Projects, and a Project may have multiple Employees.
JAVA,Hibernate,Programming,Spring Boot,REST API,Software Development,Technology,JPA,ManyToMany

On the JAVA side, consider the Many-to-Many relationship of Employee and Project:
// Employee class
public class Employee {
    private int id = 0;
    private String name = “”;
    …
    // collection hold Projects
    private Set<Project> projects = null;
}

// Project class
public class Project {
    private int id = 0;
    private String name = “”;
    …
    // collection of the Employee
    private Set<Employee> employees = null;
}
Collection attributes exist for Employee and Project. We can manipulate the collection attribute in JAVA by calling methods in each of the preceding classes. However, mapping Employees and Projects in two tables is not possible in the Database. Because the Employee class contains a collection of Projects, there is a primary and foreign key relationship between these two entities in the database. This also applies to the Project entity.
JAVA,Hibernate,Programming,Spring Boot,REST API,Software Development,Technology,JPA,ManyToMany

As a result, we need to keep track of which Employee is working on which Project and vice-versa, and we need some mechanism to do so. We'll need another table to keep track of the relationship between Employees and Projects at the database level. This table is commonly referred to as a join table or a link table. This table consists primarily of the foreign keys required to define the relationship between Employees and Projects. In the following section, we will learn how to configure the join table using Spring Boot annotations.

2. Spring Boot project creation

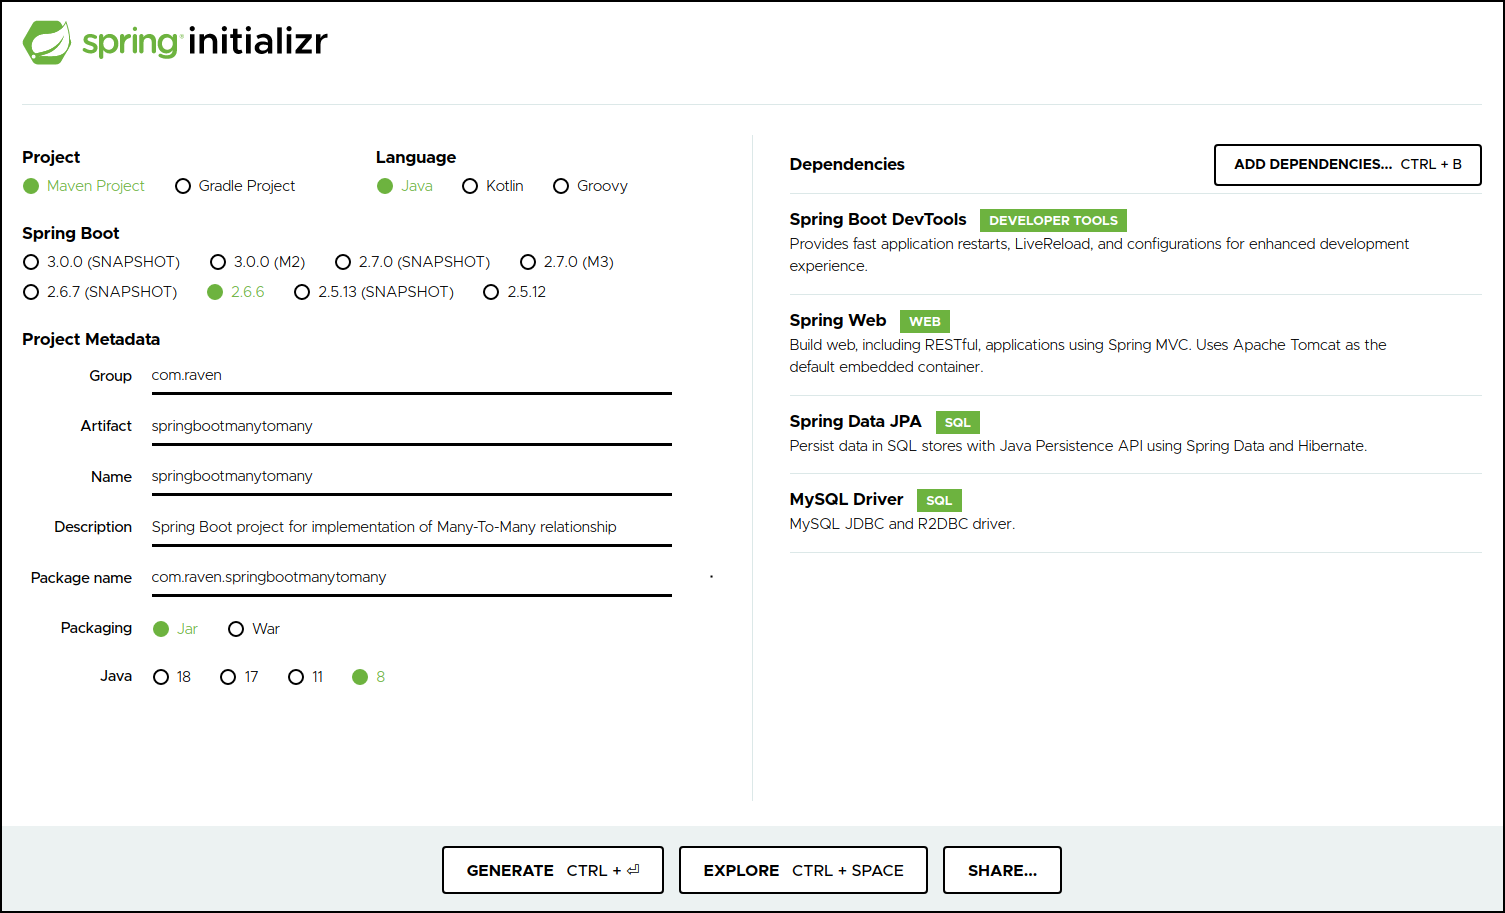
We will use Spring Initializr to create a new Spring Boot project, which will generate a basic structure for our Spring Boot project. The following dependencies have been added:
  • Spring Boot DevTools - necessary development tools  
  • Spring Web - for Spring MVC and embedded Tomcat that will run the Spring Boot application  
  • Spring Data JPA - Java Persistence API
  • MySQL Driver - JDBC driver for MySQL (for other DB you have to choose that dependency for that DB)
JAVA,Hibernate,Programming,Spring Boot,REST API,Software Development,Technology,JPA,ManyToMany

Then click on GENERATE to download the project zip file. Unzip the zip file. Now import the project in Eclipse/Visual Studio Code as a Maven project.

3. Connect to the Database

We'll put the connection information in the application because we're using MySQL as our database. Hibernate will use this information to connect to the database as the application.properties file has a name/value pair. The connection information is described in the following snippet:
JAVA,Hibernate,Programming,Spring Boot,REST API,Software Development,Technology,JPA,ManyToMany

Here, we've set datasource.url to the URL of our JDBC connection. The database credentials are mentioned in datasource.user and datasource.password.

Spring Boot can gather the necessary information about the database from the connection URL, so it is not necessary to specify datasource.driver-class-name. However, we will be safer if we specify the driver-class-name.

When the application is running, jpa.show-sql displays Hibernate SQL queries in the console, jpa.hibernate.ddl-auto is set to update, which updates the database schema every time we restart the application, and hibernate.dialect indicates which database dialect we use.

👉 We create two entities to demonstrate the Many-to-Many relationship: Employee and Project. We establish a Many-To-Many relationship between these two entities by using the @ManyToMany annotation.

Here is the final project structure:
JAVA,Hibernate,Programming,Spring Boot,REST API,Software Development,Technology,JPA,ManyToMany

4. Entities

First, create a package called entity and create the Employee class in it:
@Entity
@Table(name = "EMPLOYEE")
public class Employee {

    @Id
    @GeneratedValue(strategy = GenerationType.IDENTITY)
    @Column(name = "ID")
    private int id;

    @Column(name = "name")
    private String name;

    @Column(name = "email")
    private String email;

    @Column(name = "technicalSkill")
    private String technicalSkill;

    @ManyToMany(fetch = FetchType.LAZY, cascade = { CascadeType.PERSIST, CascadeType.MERGE, CascadeType.DETACH, CascadeType.REFRESH })
    @JoinTable(name = "EMPLOYEE_PROJECT_MAPPING", joinColumns = @JoinColumn(name = "employee_id"), 
        	inverseJoinColumns = @JoinColumn(name = "project_id"))
    private Set<Project> projects;

    public Employee() {
    }

    public Employee(String name, String email, String technicalSkill) {
        this.name = name;
        this.email = email;
        this.technicalSkill = technicalSkill;
    }

    public int getId() { return id; }
    public void setId(int id) { this.id = id; }

    public String getName() { return name; }
    public void setName(String name) { this.name = name; }

    public String getEmail() { return email; }
    public void setEmail(String email) { this.email = email; }

    public String getTechnicalSkill() { return technicalSkill; }
    public void setTechnicalSkill(String technicalSkill) { this.technicalSkill = technicalSkill; }

    public Set<Project> getProjects() { return projects; }
    public void setProjects(Set<Project> projects) { this.projects = projects; }

    @Override
    public String toString() {
        return "Employee [email=" + email + ", id=" + id + ", name=" + name + ", 
            technicalSkill=" + technicalSkill + "]";
    }
}
We are actually establishing a relationship between Employee and Project by using the @ManyToMany annotation.

Using @JoinTable annotation, we create the join table or the link table and its details:    
  • The join table is called EMPLOYEE_PROJECT_MAPPING, and its columns are employee_id and project_id
  • While viewing this many-to-many relationship from the Employee side, joinColumns (employee_id) is used to set a reference to the Employee entity, and inverseJoinColumns (project_id) refers to the Project entity.
  • As a result, from the perspective of an Employee, the ID column of the EMPLOYEE table will have a foreign key relationship with the employee_id column of the EMPLOYEE_PROJECT_MAPPING table.
  • The inverseJoinColumns (project_id) refers to the Employee's other side, which is the Project entity.
JAVA,Hibernate,Programming,Spring Boot,REST API,Software Development,Technology,JPA,ManyToMany


Now create the Project class in the entity package:
@Entity
@Table(name = "PROJECT")
public class Project {

    @Id
    @GeneratedValue(strategy = GenerationType.IDENTITY)
    @Column(name = "ID")
    private int id;

    @Column(name = "projectName")
    private String projectName;

    @Column(name = "technologyUsed")
    private String technologyUsed;

    @ManyToMany(fetch = FetchType.LAZY, cascade = { CascadeType.PERSIST, CascadeType.MERGE, CascadeType.DETACH, CascadeType.REFRESH })
    @JoinTable(name = "EMPLOYEE_PROJECT_MAPPING", joinColumns = @JoinColumn(name = "project_id"), 
        inverseJoinColumns = @JoinColumn(name = "employee_id"))
    private Set<Employee> employees;

    public Project() {}

    public Project(String projectName, String technologyUsed) {
        this.projectName = projectName;
        this.technologyUsed = technologyUsed;
    }

    public int getId() { return id; }
    public void setId(int id) { this.id = id; }

    public String getProjectName() { return projectName; }
    public void setProjectName(String projectName) { this.projectName = projectName; }

    public String getTechnologyUsed() { return technologyUsed; }
    public void setTechnologyUsed(String technologyUsed) { this.technologyUsed = technologyUsed; }

    public Set<Employee> getEmployees() { return employees; }
    public void setEmployees(Set<Employee> employees) { this.employees = employees; }

    @Override
    public String toString() {
        return "Project [id=" + id + ", projectName=" + projectName 
        	+ ", technologyUsed=" + technologyUsed + "]";
    }
}
Using @ManyToMany annotation, we are actually establishing a mapping relationship between Employee and Project.

Using @JoinTable annotation, we are creating the join table or the link table and its details. 
  • The join table is called EMPLOYEE_PROJECT_MAPPING, and its columns are project_id and employee_id.
  • While viewing this many-to-many relationship from the Project side, joinColumns (project_id) is used to set a reference to the Project entity, and inverseJoinColumns (employee_id) refers to the Employee entity.
  • As a result, the PROJECT table's ID column will have a foreign key relationship with the EMPLOYEE_PROJECT_MAPPING table's project_id.
  • The inverseJoinColumns (employee_id) refers to the Employee entity on the other side of the Project.
JAVA,Hibernate,Programming,Spring Boot,REST API,Software Development,Technology,JPA,ManyToMany

So, by using a join table, we can create a many-to-many relationship between Employee and Project. The diagram below depicts the key-level relationship between the entities and the join table.
spring boot,java,hibernate,jpa,one to many,bi directional,uni directional,orm,autowired,post mapping,get mapping,request mapping,rest controller,jpa repository

5. Repositories

The repository in Spring Boot is the data access layer that allows us to interact with our real database for operations like insert, update, and delete using Spring Data JPA. We have significantly reduced the number of boilerplate codes required to perform database operations as our EmployeeRepository and ProjectRepository extend JpaRepository.    

Make a package called repository and create the EmployeeRepository interface in it:
public interface EmployeeRepository extends JpaRepository<Employee, Integer> {
}

And create the ProjectRepository interface in the repository package:
public interface ProjectRepository extends JpaRepository<Project, Integer< {
}

6. Controllers

A controller is a class that has one or more public methods. Controllers are typically placed in the Controller directory. If a class is annotated with @Controller or @RestController in Spring Boot, it will serve as a controller, and its public methods will be exposed as HTTP endpoints if they are annotated with @PostMapping or @GetMapping.

As a result, an HTTP GET request to http://localhost:PORT/method-name invokes the @GetMapping method of the ExampleController class.

Make a package called the controller and create the EmployeeController class in it. The EmployeeController class consists of the following methods:
  1. Save a new employee (/saveEmployee)
  2. Create a new employee and assign him/her to an existing project (/createEmployeeForProject/{projId})
  3. Fetch some existing employees and assign them to an existing project (/assignEmployeeToProject/{projId})
  4. Fetch an employee details (/getEmployee/{empId})
@RestController
@RequestMapping("/api/employee")
public class EmployeeController {
    @Autowired
    private EmployeeRepository employeeRepository;

    @Autowired
    private ProjectRepository projectRepository;

    @PostMapping(value = "/createEmployee")
    public String createEmployee(@RequestBody Employee entity) {
        System.out.println("\nCreate a new Employee." + "\n");

        // create a new Employee
        Employee employee = new Employee(entity.getName(), entity.getEmail(), 
        							entity.getTechnicalSkill());

        // save Employee
        employee = employeeRepository.save(employee);
        System.out.println("\nSaved employee :: " + employee + "\n");

        return "Employee saved!!!";
    }

@PostMapping(value = "/createEmployeeForProject/{projId}")
    public String createEmployeeForProject(@RequestBody Employee entity,
            @PathVariable(name = "projId") String projId) {
        System.out.println("\nCreate a new Employee and 
        				assign to an existing Project." + "\n");

        // create a new Employee
        Employee employee = new Employee(entity.getName(), entity.getEmail(), 
        						entity.getTechnicalSkill());

        // save Employee
        employee = employeeRepository.save(employee);
        System.out.println("\nSaved employee :: " + employee + "\n");

        // get a Project
        Project project = this.projectRepository.getById(Integer.valueOf(projId));
        System.out.println("\nProject details :: " + project.toString() + "\n");

        // create Employee set
        Set<Employee> employees = new HashSetSet<>();
        employees.add(employee);

        // assign Employee Set to Project
        project.setEmployees(employees);

        // save Project
        project = projectRepository.save(project);

        System.out.println("\nEmployee assigned to the Project." + "\n");

        return "Employee saved!!!";
    }

    @PostMapping(value = "/assignEmployeeToProject/{projId}")
    public String assignEmployeeToProject(@PathVariable(name = "projId") Integer projId) {
        System.out.println("\nFetch existing Employee details and assign 
        						them to an existing Project." + "\n");

        // get first Employee
        int emplId = 1;
        Employee employee1 = this.employeeRepository.getById(emplId);
        System.out.println("\nEmployee details :: " + employee1.toString() + "\n");

        // get first Employee
        emplId = 8;
        Employee employee2 = this.employeeRepository.getById(emplId);
        System.out.println("\nEmployee details :: " + employee2.toString() + "\n");

        // get a Project
        Project project = this.projectRepository.getById(projId);
        System.out.println("\nProject details :: " + project.toString() + "\n");

        // create Employee set
        Set<Employee> employees = new HashSetSet<>();
        employees.add(employee1);
        employees.add(employee2);

        // assign Employee Set to Project
        project.setEmployees(employees);

        // save Project
        project = projectRepository.save(project);

        System.out.println("Employees assigned to the Project." + "\n");

        return "Employee saved!!!";
    }

    @GetMapping(value = "/getEmployee/{empId}")
    public String getEmployee(@PathVariable(name = "empId") Integer empId) {
        System.out.println("Fetch Employee and Project details.");

        // get Employee details
        Employee employee = this.employeeRepository.getById(empId);
        System.out.println("\nEmployee details :: " + employee.toString() + "\n");
        System.out.println("\nProject details :: " + employee.getProjects() + "\n");

        System.out.println("Done!!!" + "\n");

        return "Employee fetched successfully!!!";
    }
}

Create the ProjectController class in the controller package. The ProjectController class consists of the following methods:
  1. Save a new project (/createProject)
  2. Create a new project and add existing employees to this project (/createProjectForEmployees)
  3. Fetch an existing project and add some existing employees to that project (/assignProjectToEmployees/{projId}/{empId})
  4. Fetch an existing project and its employees (/getProject/{projId})
@RestController
@RequestMapping("/api/project")
public class ProjectController {
    @Autowired
    private ProjectRepository projectRepository;

    @Autowired
    private EmployeeRepository employeeRepository;

    @PostMapping("/createProject")
    public String createProject(@RequestBody Project entity) {
        System.out.println("\nCreate a new Project.\n");

        // new Project
        Project project = new Project(entity.getProjectName(), entity.getTechnologyUsed());

        // save Project
        project = projectRepository.save(project);
        System.out.println("\nSaved Project :: " + project + "\n");
        return "Project saved!!!";
    }

    @PostMapping("/createProjectForEmployees")
    public String createProjectForEmployee(@RequestBody Project entity) {
        System.out.println("\nCreate new Project and 
        		add existing Employees into this Project." + "\n");

        // get first Employee
        int emplId = 7;
        Employee employee1 = this.employeeRepository.getById(emplId);
        System.out.println("\nEmployee details :: " + employee1.toString() + "\n");

        // get first Employee
        emplId = 9;
        Employee employee2 = this.employeeRepository.getById(emplId);
        System.out.println("\nEmployee details :: " + employee2.toString() + "\n");

        // new Project
        Project project = new Project(entity.getProjectName(), 
        					entity.getTechnologyUsed());

        // create Employee set
        Set<Employee> employees = new HashSetSet<>();
        employees.add(employee1);
        employees.add(employee2);

        // assign Employee Set to Project
        project.setEmployees(employees);

        // save Project
        project = projectRepository.save(project);
        System.out.println("\nSaved Project :: " + project + "\n");

        return "Project saved!!!";
    }

    @PostMapping("/assignProjectToEmployees/{projId}/{empId}")
    public String assignProjectToEmployees(@PathVariable(name = "projId") Integer projId,
            @PathVariable(name = "empId") Integer empId) {
        System.out.println("\nFetch existing Project and 
        			add existing Employee into this Project." + "\n");

        // get Employee
        Employee employee = this.employeeRepository.getById(empId);
        System.out.println("\nEmployee details :: " + employee.toString() + "\n");

        // new Project
        Project project = this.projectRepository.getById(projId);
        System.out.println("\nProject details :: " + project.toString() + "\n");

        // create Employee set
        Set<Employee> employees = new HashSetSet<>();
        employees.add(employee);

        // assign Employee Set to Project
        project.setEmployees(employees);

        // save Project
        project = projectRepository.save(project);
        System.out.println("\nSaved Project :: " + project + "\n");

        return "Project saved!!!";
    }

    @GetMapping(value = "/getProject/{projId}")
    public String getProject(@PathVariable(name = "projId") Integer projId) {
        System.out.println("Fetch Project and its Employees." + "\n");

        // get Project details
        Project project = this.projectRepository.getById(projId);
        System.out.println("\nProject details :: " + project.toString() + "\n");
        System.out.println("\nEmployees details :: " + project.getEmployees() + "\n");

        System.out.println("Done!!!" + "\n");

        return "Project fetched successfully!!!";
    }
}

7. Run the Project

To run the project in Visual Studio Code, follow these steps:
  1. Open SpringbootmanytomanyApplication.java.
  2. Click on Run to run the Java program.
spring boot,java,hibernate,jpa,one to many,bi directional,uni directional,orm,autowired,post mapping,get mapping,request mapping,rest controller,jpa repository

To run the project in Eclipse/STS, follow these steps:
  1. Right-click on SpringbootmanytomanyApplication.java.
  2. Then choose Run As, then click on Spring Boot App.
spring boot,java,hibernate,jpa,one to many,bi directional,uni directional,orm,autowired,post mapping,get mapping,request mapping,rest controller,jpa repository

Examine the audit log in the console (Eclipse/STS/VS Code) now: Hibernate has created three tables for us - EMPLOYEE, EMPLOYEE_PROJECT_MAPPING, and PROJECT - and modified the EMPLOYEE_PROJECT_MAPPING table to add a constraint (Foreign key) to set reference with the EMPLOYEE and PROJECT tables. As a result, we have successfully mapped JAVA Objects to database tables.    
spring boot,java,hibernate,jpa,one to many,bi directional,uni directional,orm,autowired,post mapping,get mapping,request mapping,rest controller,jpa repository

Because we did not specify a port in the application.properties file, our project will run on port 8080, and the default URL to access any REST API in this project is http://localhost:8080/. Because our project runs on our local machine, we used localhost. If your project is running on a remote server or in EC2, you must use the remote server's or EC2's IP address or the elastic IP address.

8. Testing of REST APIs

Now we'll put those REST APIs in the employee and project controllers to the test.

👉 Create Employee

To create a new Employee, we will use the following URL in Postman:
http://localhost:8080/api/employee/createEmployee
spring boot,java,hibernate,jpa,one to many,bi directional,uni directional,orm,autowired,post mapping,get mapping,request mapping,rest controller,jpa repository

Then inspect the audit log in the console:
spring boot,java,hibernate,jpa,one to many,bi directional,uni directional,orm,autowired,post mapping,get mapping,request mapping,rest controller,jpa repository

So we've successfully saved a new employee. We save eight new people by using this REST API. The database's EMPLOYEE table is as follows:
spring boot,java,hibernate,jpa,one to many,bi directional,uni directional,orm,autowired,post mapping,get mapping,request mapping,rest controller,jpa repository

👉 Create Project

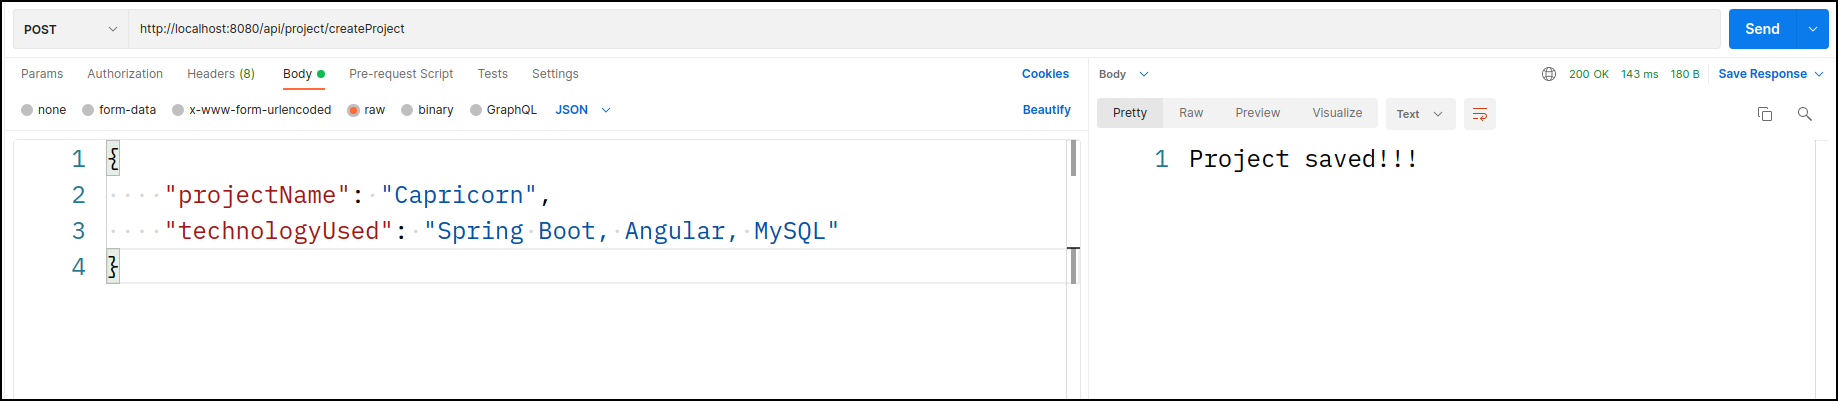
To create a fresh Project we call this URL in the Postman:
http://localhost:8080/api/project/createProject
spring boot,java,hibernate,jpa,one to many,bi directional,uni directional,orm,autowired,post mapping,get mapping,request mapping,rest controller,jpa repository

Then inspect the audit log in the console:
spring boot,java,hibernate,jpa,one to many,bi directional,uni directional,orm,autowired,post mapping,get mapping,request mapping,rest controller,jpa repository

So we successfully created a new project. We will create four new projects by calling this REST API. The PROJECT table from the database is as follows:
spring boot,java,hibernate,jpa,one to many,bi directional,uni directional,orm,autowired,post mapping,get mapping,request mapping,rest controller,jpa repository

👉 Create Employee for Project

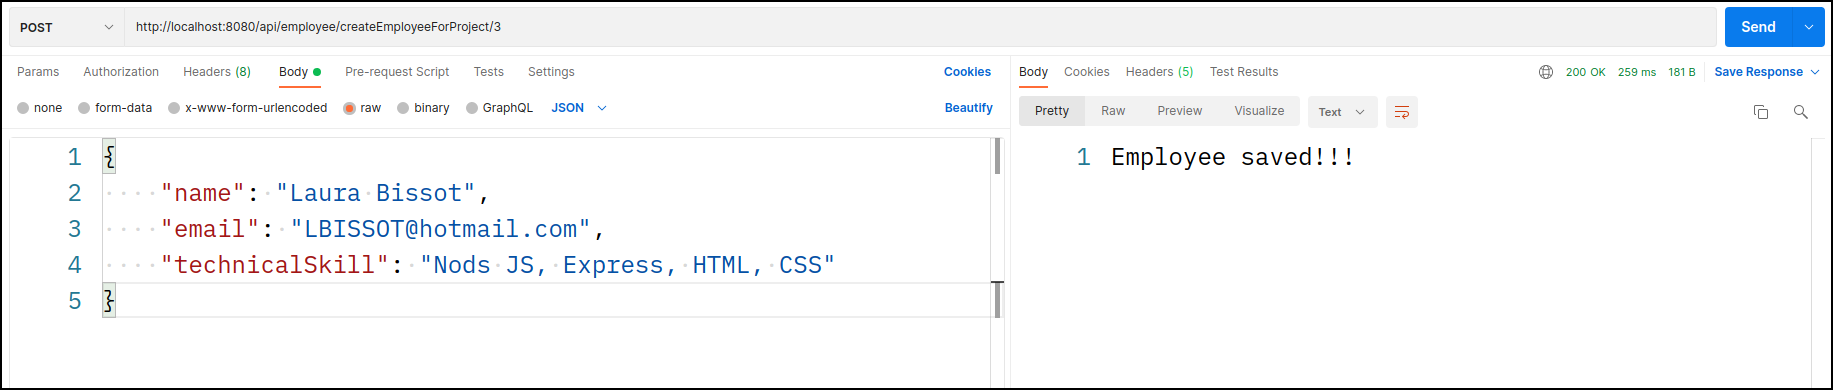
We can create a new employee with this request and then place that employee in an existing project. The following is the URL:
http://localhost:8080/api/employee/createEmployeeForProject/3
spring boot,java,hibernate,jpa,one to many,bi directional,uni directional,orm,autowired,post mapping,get mapping,request mapping,rest controller,jpa repository

Then inspect the audit log in the console:
spring boot,java,hibernate,jpa,one to many,bi directional,uni directional,orm,autowired,post mapping,get mapping,request mapping,rest controller,jpa repository

So Hibernate saves the employee data in the EMPLOYEE table first, then fetches the project details from the PROJECT table using the provided project id, and saves the id value in the EMPLOYEE_PROJECT_MAPPING table - this establishes the relationship between employee and project. The database's EMPLOYEE_PROJECT_MAPPING table is as follows:
spring boot,java,hibernate,jpa,one to many,bi directional,uni directional,orm,autowired,post mapping,get mapping,request mapping,rest controller,jpa repository

👉 Assign Employee to a Project

We will retrieve employee and project information with this request and then assign those employees to that project. We passed project id, value 2, in the URL, and employee ids are defined in the code:
http://localhost:8080/api/employee/assignEmployeeToProject/2
spring boot,java,hibernate,jpa,one to many,bi directional,uni directional,orm,autowired,post mapping,get mapping,request mapping,rest controller,jpa repository

Then inspect the audit log in the console:
spring boot,java,hibernate,jpa,one to many,bi directional,uni directional,orm,autowired,post mapping,get mapping,request mapping,rest controller,jpa repository

And mapping was created successfully. Here is the EMPLOYEE_PROJECT_MAPPING table from the database:
spring boot,java,hibernate,jpa,one to many,bi directional,uni directional,orm,autowired,post mapping,get mapping,request mapping,rest controller,jpa repository

👉 Get Employee details

We will call this URL to get the employee details along their project - We have passed the employee id (value is 8):
http://localhost:8080/api/employee/getEmployee/8
spring boot,java,hibernate,jpa,one to many,bi directional,uni directional,orm,autowired,post mapping,get mapping,request mapping,rest controller,jpa repository

Here is the audit log of the console:
spring boot,java,hibernate,jpa,one to many,bi directional,uni directional,orm,autowired,post mapping,get mapping,request mapping,rest controller,jpa repository

So we obtained information about a specific employee as well as information about his or her project. It's also worth noting that the second Hibernate query - join table, EMPLOYEE_PROJECT_MAPPING, is used to retrieve project information.

👉 Create a Project for Employee

We will use this REST API to create a new Project and add some existing employees to it:
http://localhost:8080/api/project/createProjectForEmployees
spring boot,java,hibernate,jpa,one to many,bi directional,uni directional,orm,autowired,post mapping,get mapping,request mapping,rest controller,jpa repository

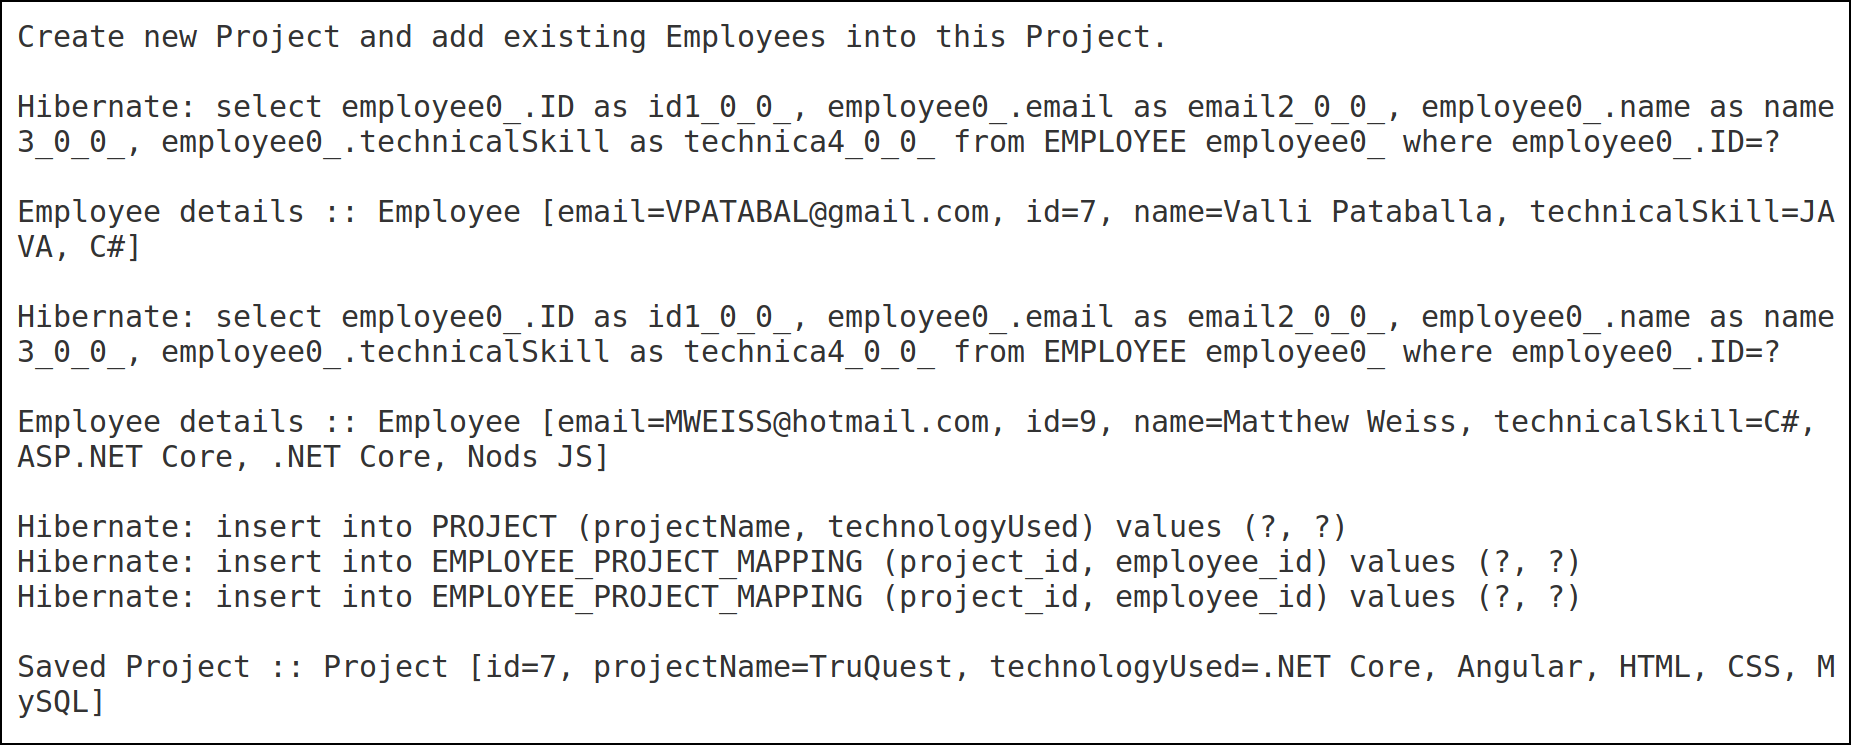
Let us see the audit log:
spring boot,java,hibernate,jpa,one to many,bi directional,uni directional,orm,autowired,post mapping,get mapping,request mapping,rest controller,jpa repository

Here is the project table from the database:
spring boot,java,hibernate,jpa,one to many,bi directional,uni directional,orm,autowired,post mapping,get mapping,request mapping,rest controller,jpa repository

👉 Get Project details

Using this REST API, we will now retrieve an existing project as well as its employee information:
http://localhost:8080/api/project/getProject/7
spring boot,java,hibernate,jpa,one to many,bi directional,uni directional,orm,autowired,post mapping,get mapping,request mapping,rest controller,jpa repository

Here is the audit log from the console:
spring boot,java,hibernate,jpa,one to many,bi directional,uni directional,orm,autowired,post mapping,get mapping,request mapping,rest controller,jpa repository

The second Hibernate query - join table (EMPLOYEE_PROJECT_MAPPING) is used to retrieve employee information.

9. Conclusion

So, This is a basic overview of how to set up a Many-To-Many relationship in Spring Boot using JPA and Hibernate. Depending on the requirements of your application, you may need to customize and extend these concepts.

You can download the source code.
Happy coding!!! 😊
in


Popular posts