In this blog post, we will learn how to add essential Spring Security to our Spring MVC Web application using JAVA configuration instead of XML
configuration.
First, we'll build a simple Spring MVC Web application and secure it with Spring Security. Spring Security's default login form is discussed in the following part.
Create Maven project
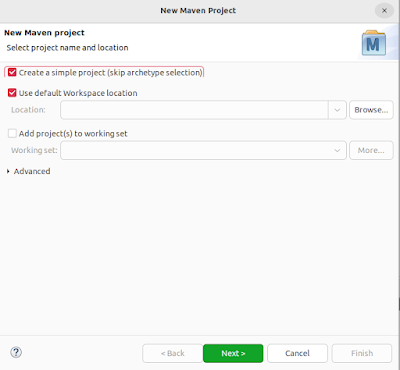
So, we will create a simple Maven project. To create a project in Eclipse,
click on the File menu, then choose
New→Maven Project.
Then select the project name and location and click Next.
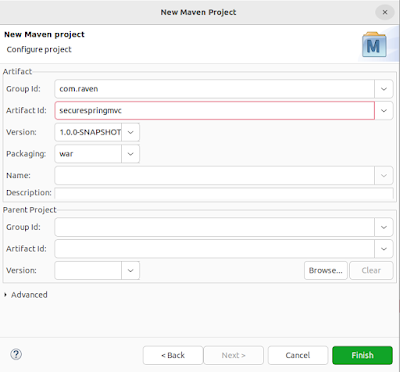
Now enter Group Id and Artifact Id and select packaging type as
war (Web Archive) as shown:
Click Finish to create the project.
POM.XML
Update
pom.xml
with these required dependencies:
<project xmlns="http://maven.apache.org/POM/4.0.0" xmlns:xsi="http://www.w3.org/2001/XMLSchema-instance" xsi:schemaLocation="http://maven.apache.org/POM/4.0.0 https://maven.apache.org/xsd/maven-4.0.0.xsd">
	<modelVersion>4.0.0</modelVersion>
	<groupId>com.raven</groupId>
	<artifactId>securespringmvc</artifactId>
	<version>1.0.0-SNAPSHOT</version>
	<name>secure-spring-web-mvc-application</name>
	<packaging>war</packaging>

	<properties>
		<springframework.version>5.3.21</springframework.version>

		<maven.compiler.source>11</maven.compiler.source>
		<maven.compiler.target>11</maven.compiler.target>
	</properties>

	<dependencies>
		<!-- Spring MVC support -->
		<dependency>
			<groupId>org.springframework</groupId>
			<artifactId>spring-webmvc</artifactId>
			<version>${springframework.version}</version>
		</dependency>

		<!-- Servlet support -->
		<dependency>
			<groupId>javax.servlet</groupId>
			<artifactId>javax.servlet-api</artifactId>
			<version>4.0.1</version>
		</dependency>

		<!-- JSP support -->
		<dependency>
			<groupId>javax.servlet.jsp</groupId>
			<artifactId>javax.servlet.jsp-api</artifactId>
			<version>2.3.3</version>
		</dependency>
	</dependencies>

	<build>
		<finalName>secure-spring-web-mvc-application</finalName>
		<pluginManagement>
			<plugins>
				<plugin>
					<groupId>org.apache.maven.plugins</groupId>
					<artifactId>maven-war-plugin</artifactId>
					<version>3.3.2</version>
				</plugin>
			</plugins>
		</pluginManagement>
	</build>
</project>
The Spring Framework version in this application is 5.3.21. We have
added Spring MVC, Servlet, and
JSP-related dependencies in pom.xml. We are using
war as the packaging type, so we use the maven-war-plugin
to build the application.
Application Configuration - View Resolver
Now, we create a class that will be used to configure
ViewResolver
using Java Configuration. Here is the sample XML configuration to configure
ViewResolver using XML configuration in Spring:
<bean
	class="org.springframework.web.servlet.view.InternalResourceViewResolver">
	<property name="prefix" value="/WEB-INF/view/" />
	<property name="suffix" value=".jsp" />
</bean>
To configure
ViewResolver using JAVA configuration, we need to create ApplicationConfiguration class in config package:
package com.raven.webmvcapp.config;

import org.springframework.context.annotation.Bean;
import org.springframework.context.annotation.ComponentScan;
import org.springframework.context.annotation.Configuration;
import org.springframework.web.servlet.ViewResolver;
import org.springframework.web.servlet.config.annotation.EnableWebMvc;
import org.springframework.web.servlet.view.InternalResourceViewResolver;

@Configuration
@EnableWebMvc
@ComponentScan(basePackages = "com.raven.webmvcapp")
public class ApplicationConfiguration {

	@Bean
	public ViewResolver viewResolver() {
		InternalResourceViewResolver resourceViewResolver = new InternalResourceViewResolver();
		resourceViewResolver.setPrefix("/WEB-INF/view/");
		resourceViewResolver.setSuffix(".jsp");

		return resourceViewResolver;
	}
}
@EnableWebMvc
provides similar support to
<mvc:annotation-driven />
as it is for XML configuration.
We are using JSP as our view technology and keeping our view files in
/WEB-INF/view/.
On the basis of the URL, application control goes to a particular controller
and then the controller returns a logical view name. Then it is the view
resolver's job to resolve the logical view name to the actual physical
resource.
The
InternalResourceViewResolver
is an implementation of the
ViewResolver interface. Using setPrefix()
and setSuffix(), view resolver maps logical view names to actual physical views.
As our prefix is "/WEB-INF/view/" and suffix is ".jsp", and if
the logical view name is "home", then InternalResourceViewResolver
will resolve this as "/WEB-INF/home.jsp".
As we are using JSP as our view technology, this will be processed by the
Servlet/JSP engine.
Initialise Dispatcher Servlet
Now we have to initialize the Spring dispatcher servlet. Here is a sample XML
configuration of the dispatcher servlet initializer:
<servlet>
	<servlet-name>dispatcher</servlet-name>
	<servlet-class>org.springframework.web.servlet.DispatcherServlet</servlet-class>
	<init-param>
		<param-name>contextConfigLocation</param-name>
		<param-value>/WEB-INF/spring-mvc-servlet.xml</param-value>
	</init-param>
	<load-on-startup>1</load-on-startup>
</servlet>

<servlet-mapping>
	<servlet-name>dispatcher</servlet-name>
	<url-pattern>/</url-pattern>
</servlet-mapping>
The
dispatcher servlet
is responsible for forwarding/dispatching the request to the appropriate
controller method. To initialize our Spring MVC application in the Servlet
container environment using JAVA configuration, we create
ApplicationDispatherServletInitializer class in the config package which will
extend AbstractAnnotationConfigDispatcherServletInitializer
class.
package com.raven.webmvcapp.config;

import org.springframework.web.servlet.support.AbstractAnnotationConfigDispatcherServletInitializer;

public class ApplicationDispatherServletInitializer
					extends AbstractAnnotationConfigDispatcherServletInitializer {

	@Override
	protected Class<?>[] getRootConfigClasses() {
		// TODO Auto-generated method stub
		return null;
	}

	@Override
	protected Class<?>[] getServletConfigClasses() {
		// application configuration mapping
		return new Class[] { ApplicationConfiguration.class };
	}

	@Override
	protected String[] getServletMappings() {
		// servlet mapping
		return new String[] { "/" };
	}
}
In this class, we need to configure our Spring MVC Java Configuration file.
That is why we have registered previously created
ApplicationConfiguration
class in getServletConfigClasses()
method.
Controller
It is time to create a controller class. Create a
HomeController class in the controller package:
package com.raven.webmvcapp.controller;

import org.springframework.stereotype.Controller;
import org.springframework.web.bind.annotation.GetMapping;

@Controller
public class HomeController {

	@GetMapping("/")
	public String showHome() {
		return "home";
	}
}
Our showHome() method will return home, and based on our
configuration, the view resolver will look for home.jsp (as we are
using JSP as our view technology) in /WEB-INF/view/. So we need to
create home.jsp in /WEB-INF/view/.
View
To create the view page, first, create a view directory under
/WEB-INF. Then create
home.jsp in the view directory:
<%@ page language="java" contentType="text/html; charset=UTF-8"
	pageEncoding="UTF-8"%>
<!DOCTYPE html>
<html>
<head>
<meta charset="UTF-8">
<title>Home - Spring Security Implementation</title>
<style>
body {
	font-family: Arial, Helvetica, sans-serif;
	margin: 0;
}
.header {
	padding: 60px;
	text-align: center;
	background: #1abc9c;
	color: white;
	font-size: 30px;
}
.content {
	padding: 20px;
}
</style>
</head>
<body>
	<div class="header">
		<h1>Spring Security</h1>
		<p>Welcome to Spring Security implementation with in-build Login
			page!</p>
	</div>
	<div class="content">
		<h1>Home</h1>
		<p>In this tutorial, we will learn how we can implement Spring
			Security to our Spring WebMVC application using JAVA configuration -
			there will be no XML configuration.</p>
	</div>
</body>
</html>
Test the Application
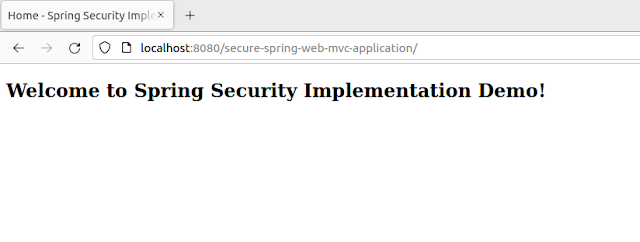
Now run this application and put this URL -
http://localhost:8080/secure-spring-web-mvc-application/, in the browser:
So our demo Spring MVC Web application is up and running!
Configure Spring Security
Now it is time to secure our MVC application using Spring Security. We need to
first update our pom.xml. Here it is:
<project xmlns="http://maven.apache.org/POM/4.0.0" xmlns:xsi="http://www.w3.org/2001/XMLSchema-instance" xsi:schemaLocation="http://maven.apache.org/POM/4.0.0 https://maven.apache.org/xsd/maven-4.0.0.xsd">
	<modelVersion>4.0.0</modelVersion>
	<groupId>com.raven</groupId>
	<artifactId>securespringmvc</artifactId>
	<version>1.0.0-SNAPSHOT</version>
	<name>secure-spring-web-mvc-application</name>
	<packaging>war</packaging>

	<properties>
		<springframework.version>5.3.21</springframework.version>
		<springsecurity.version>5.6.6</springsecurity.version>

		<maven.compiler.source>11</maven.compiler.source>
		<maven.compiler.target>11</maven.compiler.target>
	</properties>

	<dependencies>
		<!-- Spring MVC support -->
		<dependency>
			<groupId>org.springframework</groupId>
			<artifactId>spring-webmvc</artifactId>
			<version>${springframework.version}</version>
		</dependency>

		<!-- https://mvnrepository.com/artifact/org.springframework.security/spring-security-web -->
		<dependency>
			<groupId>org.springframework.security</groupId>
			<artifactId>spring-security-web</artifactId>
			<version>${springsecurity.version}</version>
		</dependency>

		<!-- https://mvnrepository.com/artifact/org.springframework.security/spring-security-config -->
		<dependency>
			<groupId>org.springframework.security</groupId>
			<artifactId>spring-security-config</artifactId>
			<version>${springsecurity.version}</version>
		</dependency>

		<!-- Servlet support -->
		<dependency>
			<groupId>javax.servlet</groupId>
			<artifactId>javax.servlet-api</artifactId>
			<version>4.0.1</version>
		</dependency>

		<!-- JSP support -->
		<dependency>
			<groupId>javax.servlet.jsp</groupId>
			<artifactId>javax.servlet.jsp-api</artifactId>
			<version>2.3.3</version>
		</dependency>
	</dependencies>

	<build>
		<finalName>secure-spring-web-mvc-application</finalName>
		<pluginManagement>
			<plugins>
				<plugin>
					<groupId>org.apache.maven.plugins</groupId>
					<artifactId>maven-war-plugin</artifactId>
					<version>3.3.2</version>
				</plugin>
			</plugins>
		</pluginManagement>
	</build>
</project>
The Spring Security version for this application is 5.6.6.
We have updated the pom.xml with two new dependencies to implement
Spring Security - spring-security-web
and spring-security-config.
Initialize Application Security
Now, we need to create a security initializer class that will extend
AbstractSecurityWebApplicationInitializer. Here is our ApplicationSecurityInitializer
class which will reside config package:
package com.raven.webmvcapp.config;

import org.springframework.security.web.context.AbstractSecurityWebApplicationInitializer;

public class ApplicationSecurityInitializer extends AbstractSecurityWebApplicationInitializer {

}
AbstractSecurityWebApplicationInitializer helps us to register the
DelegatingFilterProxy
to use the Spring Security Filter. When we request any web resource,
Spring Security Filter will process those requests and enable user if
the user to access the protected web resource.
Configure Application Security
As we are going to customize the security configuration, we will disable auto
security configuration and specify the user name and password - that is why we
need to create a custom security configuration class by extending
WebSecurityConfigurerAdapter
class. So, create ApplicationSecutiryConfiguration
class in config package:
package com.raven.webmvcapp.config;

import org.springframework.context.annotation.Configuration;
import org.springframework.security.config.annotation.authentication.builders.AuthenticationManagerBuilder;
import org.springframework.security.config.annotation.web.configuration.EnableWebSecurity;
import org.springframework.security.config.annotation.web.configuration.WebSecurityConfigurerAdapter;
import org.springframework.security.core.userdetails.User;
import org.springframework.security.core.userdetails.User.UserBuilder;

@Configuration
@EnableWebSecurity
public class ApplicationSecutiryConfiguration extends WebSecurityConfigurerAdapter {

	@Override
	protected void configure(AuthenticationManagerBuilder auth) throws Exception {
		UserBuilder userBuilder =
        			User.withDefaultPasswordEncoder();
		auth.inMemoryAuthentication()
        			.withUser(userBuilder.username("admin")
              .password("admin123")
              .roles("ADMIN"));
	}
}
We have annotated this class with
@EnableWebSecurity
to disable default security configurations. WebSecurityConfigurerAdapter
provides us several methods and we can override them to customize the
security. One of these methods is configure(). As we are going to
authenticate users based on their user name and password, we have
used AuthenticationManagerBuilder class to authenticate users. Here, we are using
inMemoryAuthentication() the method that will allow us to set hard-coded user credentials. The
authentication process which is described here is only for understanding basic
Spring Security, we learn to authenticate users with a database.
Test Application with Spring Security
Now run this application again and put this URL - http://localhost:8080/secure-spring-web-mvc-application/ in the browser:
In our application, we did not create any login page, we just configured the
Spring Security. This is a built-in login page provided by Spring Security
itself to authenticate the user.
We need to provide the username and password that we mentioned in
ApplicationSecutiryConfiguration
class to log in to the application. After successful login, we can see our
home page. If you provide the wrong credentials, you can see the error on the
login page, which means Spring Security will not authenticate you.
You can download the source code from
here.
Happy coding!!! 😊


Gracias, muy bueno, llegue por otro post tomado de aqui.
ReplyDeletehttps://medium.com/@arijit83work/spring-security-using-java-configuration-in-spring-mvc-web-application-86042153806