Combining JPA (Java Persistence API) with Hibernate as the underlying ORM (Object-Relational Mapping) framework allows for the establishment of a Many-To-Many relationship between entities. In this blog post, we'll look at how to use Hibernate and JPA to implement a Many-To-Many relationship in Spring Boot.
1. What is a Many-To-Many association
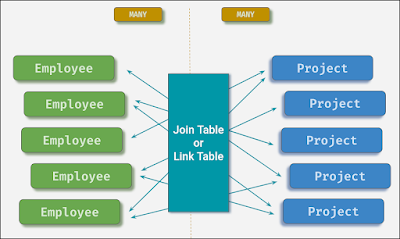
A Many-To-Many relationship exists when two entities are linked in such a way that one entity has many (collections) of the other entity and vice versa. Consider the relationship between a student and a teacher. Students are taught by many Teachers, and each Teacher has a class of many Students. Here's another example: Employees and Projects can have many-to-many relationships. In this case, an Employee may work on multiple Projects, and a Project may have multiple Employees.
On the JAVA side, consider the Many-to-Many relationship of Employee and Project:
// Employee class
public class Employee {
    private int id = 0;
    private String name = “”;
    …
    // collection hold Projects
    private Set<Project> projects = null;
}

// Project class
public class Project {
    private int id = 0;
    private String name = “”;
    …
    // collection of the Employee
    private Set<Employee> employees = null;
}
Collection attributes exist for Employee and Project. We can manipulate the collection attribute in JAVA by calling methods in each of the preceding classes. However, mapping Employees and Projects in two tables is not possible in the Database. Because the Employee class contains a collection of Projects, there is a primary and foreign key relationship between these two entities in the database. This also applies to the Project entity.
As a result, we need to keep track of which Employee is working on which Project and vice-versa, and we need some mechanism to do so. We'll need another table to keep track of the relationship between Employees and Projects at the database level. This table is commonly referred to as a join table or a link table. This table consists primarily of the foreign keys required to define the relationship between Employees and Projects. In the following section, we will learn how to configure the join table using Spring Boot annotations.
2. Spring Boot project creation
We will use Spring Initializr to create a new Spring Boot project, which will generate a basic structure for our Spring Boot project. The following dependencies have been added:
- Spring Boot DevTools - necessary development tools
- Spring Web - for Spring MVC and embedded Tomcat that will run the Spring Boot application
- Spring Data JPA - Java Persistence API
- MySQL Driver - JDBC driver for MySQL (for other DB you have to choose that dependency for that DB)
Then click on GENERATE to download the project zip file. Unzip the zip file. Now import the project in Eclipse/Visual Studio Code as a Maven project.
3. Connect to the Database
We'll put the connection information in the application because we're using MySQL as our database. Hibernate will use this information to connect to the database as the application.properties file has a name/value pair. The connection information is described in the following snippet:
Here, we've set datasource.url to the URL of our JDBC connection. The database credentials are mentioned in datasource.user and datasource.password.
Spring Boot can gather the necessary information about the database from the connection URL, so it is not necessary to specify datasource.driver-class-name. However, we will be safer if we specify the driver-class-name.
When the application is running, jpa.show-sql displays Hibernate SQL queries in the console, jpa.hibernate.ddl-auto is set to update, which updates the database schema every time we restart the application, and hibernate.dialect indicates which database dialect we use.
👉 We create two entities to demonstrate the Many-to-Many relationship: Employee and Project. We establish a Many-To-Many relationship between these two entities by using the @ManyToMany annotation.
Here is the final project structure:
4. Entities
First, create a package called entity and create the Employee class in it:
@Entity
@Table(name = "EMPLOYEE")
public class Employee {

    @Id
    @GeneratedValue(strategy = GenerationType.IDENTITY)
    @Column(name = "ID")
    private int id;

    @Column(name = "name")
    private String name;

    @Column(name = "email")
    private String email;

    @Column(name = "technicalSkill")
    private String technicalSkill;

    @ManyToMany(fetch = FetchType.LAZY, cascade = { CascadeType.PERSIST, CascadeType.MERGE, CascadeType.DETACH, CascadeType.REFRESH })
    @JoinTable(name = "EMPLOYEE_PROJECT_MAPPING", joinColumns = @JoinColumn(name = "employee_id"),
        	inverseJoinColumns = @JoinColumn(name = "project_id"))
    private Set<Project> projects;

    public Employee() {
    }

    public Employee(String name, String email, String technicalSkill) {
        this.name = name;
        this.email = email;
        this.technicalSkill = technicalSkill;
    }

    public int getId() { return id; }
    public void setId(int id) { this.id = id; }

    public String getName() { return name; }
    public void setName(String name) { this.name = name; }

    public String getEmail() { return email; }
    public void setEmail(String email) { this.email = email; }

    public String getTechnicalSkill() { return technicalSkill; }
    public void setTechnicalSkill(String technicalSkill) { this.technicalSkill = technicalSkill; }

    public Set<Project> getProjects() { return projects; }
    public void setProjects(Set<Project> projects) { this.projects = projects; }

    @Override
    public String toString() {
        return "Employee [email=" + email + ", id=" + id + ", name=" + name + ",
            technicalSkill=" + technicalSkill + "]";
    }
}
We are actually establishing a relationship between Employee and Project by using the @ManyToMany annotation.
Using @JoinTable annotation, we create the join table or the
link table and its details:
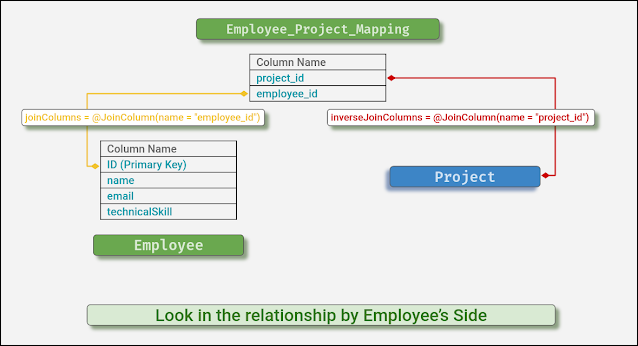
- The join table is called EMPLOYEE_PROJECT_MAPPING, and its columns are employee_id and project_id.
- While viewing this many-to-many relationship from the Employee side, joinColumns (employee_id) is used to set a reference to the Employee entity, and inverseJoinColumns (project_id) refers to the Project entity.
- As a result, from the perspective of an Employee, the ID column of the EMPLOYEE table will have a foreign key relationship with the employee_id column of the EMPLOYEE_PROJECT_MAPPING table.
- The inverseJoinColumns (project_id) refers to the Employee's other side, which is the Project entity.
Now create the Project class in the entity package:
@Entity
@Table(name = "PROJECT")
public class Project {

    @Id
    @GeneratedValue(strategy = GenerationType.IDENTITY)
    @Column(name = "ID")
    private int id;

    @Column(name = "projectName")
    private String projectName;

    @Column(name = "technologyUsed")
    private String technologyUsed;

    @ManyToMany(fetch = FetchType.LAZY, cascade = { CascadeType.PERSIST, CascadeType.MERGE, CascadeType.DETACH, CascadeType.REFRESH })
    @JoinTable(name = "EMPLOYEE_PROJECT_MAPPING", joinColumns = @JoinColumn(name = "project_id"),
        inverseJoinColumns = @JoinColumn(name = "employee_id"))
    private Set<Employee> employees;

    public Project() {}

    public Project(String projectName, String technologyUsed) {
        this.projectName = projectName;
        this.technologyUsed = technologyUsed;
    }

    public int getId() { return id; }
    public void setId(int id) { this.id = id; }

    public String getProjectName() { return projectName; }
    public void setProjectName(String projectName) { this.projectName = projectName; }

    public String getTechnologyUsed() { return technologyUsed; }
    public void setTechnologyUsed(String technologyUsed) { this.technologyUsed = technologyUsed; }

    public Set<Employee> getEmployees() { return employees; }
    public void setEmployees(Set<Employee> employees) { this.employees = employees; }

    @Override
    public String toString() {
        return "Project [id=" + id + ", projectName=" + projectName
        	+ ", technologyUsed=" + technologyUsed + "]";
    }
}
Using @ManyToMany annotation, we are actually establishing a mapping
relationship between Employee and Project.
Using @JoinTable annotation, we are creating the join table or the
link table and its details.
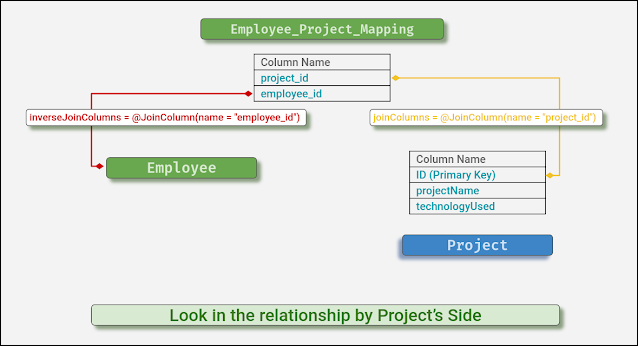
- The join table is called EMPLOYEE_PROJECT_MAPPING, and its columns are project_id and employee_id.
- While viewing this many-to-many relationship from the Project side, joinColumns (project_id) is used to set a reference to the Project entity, and inverseJoinColumns (employee_id) refers to the Employee entity.
- As a result, the PROJECT table's ID column will have a foreign key relationship with the EMPLOYEE_PROJECT_MAPPING table's project_id.
- The inverseJoinColumns (employee_id) refers to the Employee entity on the other side of the Project.
So, by using a join table, we can create a many-to-many relationship between Employee and Project. The diagram below depicts the key-level relationship between the entities and the join table.
5. Repositories
The repository in Spring Boot is the data access layer that allows us to interact with our real database for operations like insert, update, and delete using Spring Data JPA. We have significantly reduced the number of boilerplate codes required to perform database operations as our EmployeeRepository and ProjectRepository extend JpaRepository.
Make a package called repository and create the EmployeeRepository interface in it:
public interface EmployeeRepository extends JpaRepository<Employee, Integer> {
}
And create the ProjectRepository interface in the repository package:
public interface ProjectRepository extends JpaRepository<Project, Integer< {
}
6. Controllers
A controller is a class that has one or more public methods. Controllers are typically placed in the Controller directory. If a class is annotated with @Controller or @RestController in Spring Boot, it will serve as a controller, and its public methods will be exposed as HTTP endpoints if they are annotated with @PostMapping or @GetMapping.
As a result, an HTTP GET request to http://localhost:PORT/method-name invokes the @GetMapping method of the ExampleController class.
Make a package called the controller and create the EmployeeController class in it. The EmployeeController class consists of the following methods:
- Save a new employee (/saveEmployee)
- Create a new employee and assign him/her to an existing project (/createEmployeeForProject/{projId})
- Fetch some existing employees and assign them to an existing project (/assignEmployeeToProject/{projId})
- Fetch an employee details (/getEmployee/{empId})
@RestController
@RequestMapping("/api/employee")
public class EmployeeController {
    @Autowired
    private EmployeeRepository employeeRepository;

    @Autowired
    private ProjectRepository projectRepository;

    @PostMapping(value = "/createEmployee")
    public String createEmployee(@RequestBody Employee entity) {
        System.out.println("\nCreate a new Employee." + "\n");

        // create a new Employee
        Employee employee = new Employee(entity.getName(), entity.getEmail(),
        							entity.getTechnicalSkill());

        // save Employee
        employee = employeeRepository.save(employee);
        System.out.println("\nSaved employee :: " + employee + "\n");

        return "Employee saved!!!";
    }

@PostMapping(value = "/createEmployeeForProject/{projId}")
    public String createEmployeeForProject(@RequestBody Employee entity,
            @PathVariable(name = "projId") String projId) {
        System.out.println("\nCreate a new Employee and
        				assign to an existing Project." + "\n");

        // create a new Employee
        Employee employee = new Employee(entity.getName(), entity.getEmail(),
        						entity.getTechnicalSkill());

        // save Employee
        employee = employeeRepository.save(employee);
        System.out.println("\nSaved employee :: " + employee + "\n");

        // get a Project
        Project project = this.projectRepository.getById(Integer.valueOf(projId));
        System.out.println("\nProject details :: " + project.toString() + "\n");

        // create Employee set
        Set<Employee> employees = new HashSetSet<>();
        employees.add(employee);

        // assign Employee Set to Project
        project.setEmployees(employees);

        // save Project
        project = projectRepository.save(project);

        System.out.println("\nEmployee assigned to the Project." + "\n");

        return "Employee saved!!!";
    }

    @PostMapping(value = "/assignEmployeeToProject/{projId}")
    public String assignEmployeeToProject(@PathVariable(name = "projId") Integer projId) {
        System.out.println("\nFetch existing Employee details and assign
        						them to an existing Project." + "\n");

        // get first Employee
        int emplId = 1;
        Employee employee1 = this.employeeRepository.getById(emplId);
        System.out.println("\nEmployee details :: " + employee1.toString() + "\n");

        // get first Employee
        emplId = 8;
        Employee employee2 = this.employeeRepository.getById(emplId);
        System.out.println("\nEmployee details :: " + employee2.toString() + "\n");

        // get a Project
        Project project = this.projectRepository.getById(projId);
        System.out.println("\nProject details :: " + project.toString() + "\n");

        // create Employee set
        Set<Employee> employees = new HashSetSet<>();
        employees.add(employee1);
        employees.add(employee2);

        // assign Employee Set to Project
        project.setEmployees(employees);

        // save Project
        project = projectRepository.save(project);

        System.out.println("Employees assigned to the Project." + "\n");

        return "Employee saved!!!";
    }

    @GetMapping(value = "/getEmployee/{empId}")
    public String getEmployee(@PathVariable(name = "empId") Integer empId) {
        System.out.println("Fetch Employee and Project details.");

        // get Employee details
        Employee employee = this.employeeRepository.getById(empId);
        System.out.println("\nEmployee details :: " + employee.toString() + "\n");
        System.out.println("\nProject details :: " + employee.getProjects() + "\n");

        System.out.println("Done!!!" + "\n");

        return "Employee fetched successfully!!!";
    }
}
Create the ProjectController class in the controller package. The ProjectController class consists of the following methods:
- Save a new project (/createProject)
- Create a new project and add existing employees to this project (/createProjectForEmployees)
- Fetch an existing project and add some existing employees to that project (/assignProjectToEmployees/{projId}/{empId})
- Fetch an existing project and its employees (/getProject/{projId})
@RestController
@RequestMapping("/api/project")
public class ProjectController {
    @Autowired
    private ProjectRepository projectRepository;

    @Autowired
    private EmployeeRepository employeeRepository;

    @PostMapping("/createProject")
    public String createProject(@RequestBody Project entity) {
        System.out.println("\nCreate a new Project.\n");

        // new Project
        Project project = new Project(entity.getProjectName(), entity.getTechnologyUsed());

        // save Project
        project = projectRepository.save(project);
        System.out.println("\nSaved Project :: " + project + "\n");
        return "Project saved!!!";
    }

    @PostMapping("/createProjectForEmployees")
    public String createProjectForEmployee(@RequestBody Project entity) {
        System.out.println("\nCreate new Project and
        		add existing Employees into this Project." + "\n");

        // get first Employee
        int emplId = 7;
        Employee employee1 = this.employeeRepository.getById(emplId);
        System.out.println("\nEmployee details :: " + employee1.toString() + "\n");

        // get first Employee
        emplId = 9;
        Employee employee2 = this.employeeRepository.getById(emplId);
        System.out.println("\nEmployee details :: " + employee2.toString() + "\n");

        // new Project
        Project project = new Project(entity.getProjectName(),
        					entity.getTechnologyUsed());

        // create Employee set
        Set<Employee> employees = new HashSetSet<>();
        employees.add(employee1);
        employees.add(employee2);

        // assign Employee Set to Project
        project.setEmployees(employees);

        // save Project
        project = projectRepository.save(project);
        System.out.println("\nSaved Project :: " + project + "\n");

        return "Project saved!!!";
    }

    @PostMapping("/assignProjectToEmployees/{projId}/{empId}")
    public String assignProjectToEmployees(@PathVariable(name = "projId") Integer projId,
            @PathVariable(name = "empId") Integer empId) {
        System.out.println("\nFetch existing Project and
        			add existing Employee into this Project." + "\n");

        // get Employee
        Employee employee = this.employeeRepository.getById(empId);
        System.out.println("\nEmployee details :: " + employee.toString() + "\n");

        // new Project
        Project project = this.projectRepository.getById(projId);
        System.out.println("\nProject details :: " + project.toString() + "\n");

        // create Employee set
        Set<Employee> employees = new HashSetSet<>();
        employees.add(employee);

        // assign Employee Set to Project
        project.setEmployees(employees);

        // save Project
        project = projectRepository.save(project);
        System.out.println("\nSaved Project :: " + project + "\n");

        return "Project saved!!!";
    }

    @GetMapping(value = "/getProject/{projId}")
    public String getProject(@PathVariable(name = "projId") Integer projId) {
        System.out.println("Fetch Project and its Employees." + "\n");

        // get Project details
        Project project = this.projectRepository.getById(projId);
        System.out.println("\nProject details :: " + project.toString() + "\n");
        System.out.println("\nEmployees details :: " + project.getEmployees() + "\n");

        System.out.println("Done!!!" + "\n");

        return "Project fetched successfully!!!";
    }
}
7. Run the Project
To run the project in Visual Studio Code, follow these steps:
- Open SpringbootmanytomanyApplication.java.
- Click on Run to run the Java program.
To run the project in Eclipse/STS, follow these steps:
- Right-click on SpringbootmanytomanyApplication.java.
- Then choose Run As, then click on Spring Boot App.
Examine the audit log in the console (Eclipse/STS/VS Code) now: Hibernate has created three tables for us - EMPLOYEE, EMPLOYEE_PROJECT_MAPPING, and PROJECT - and modified the EMPLOYEE_PROJECT_MAPPING table to add a constraint (Foreign key) to set reference with the EMPLOYEE and PROJECT tables. As a result, we have successfully mapped JAVA Objects to database tables.
Because we did not specify a port in the application.properties file, our project will run on port 8080, and the default URL to access any REST API in this project is http://localhost:8080/. Because our project runs on our local machine, we used localhost. If your project is running on a remote server or in EC2, you must use the remote server's or EC2's IP address or the elastic IP address.
8. Testing of REST APIs
Now we'll put those REST APIs in the employee and project controllers to the test.
👉 Create Employee
To create a new Employee, we will use the following URL in Postman:
http://localhost:8080/api/employee/createEmployeeThen inspect the audit log in the console:
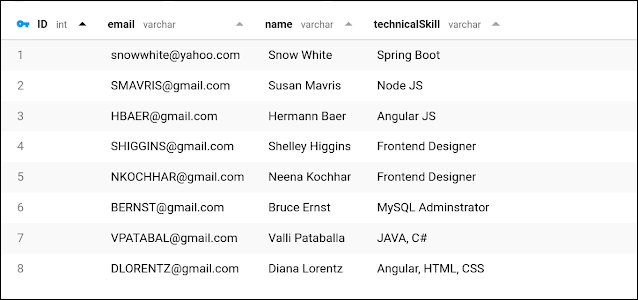
So we've successfully saved a new employee. We save eight new people by using this REST API. The database's EMPLOYEE table is as follows:
👉 Create Project
To create a fresh Project we call this URL in the Postman:
http://localhost:8080/api/project/createProjectThen inspect the audit log in the console:
So we successfully created a new project. We will create four new projects by calling this REST API. The PROJECT table from the database is as follows:
👉 Create Employee for Project
We can create a new employee with this request and then place that employee in an existing project. The following is the URL:
http://localhost:8080/api/employee/createEmployeeForProject/3Then inspect the audit log in the console:
So Hibernate saves the employee data in the EMPLOYEE table first, then fetches the project details from the PROJECT table using the provided project id, and saves the id value in the EMPLOYEE_PROJECT_MAPPING table - this establishes the relationship between employee and project. The database's EMPLOYEE_PROJECT_MAPPING table is as follows:
👉 Assign Employee to a Project
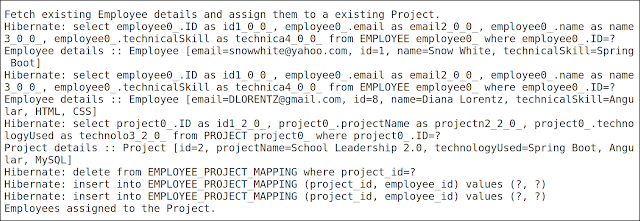
We will retrieve employee and project information with this request and then assign those employees to that project. We passed project id, value 2, in the URL, and employee ids are defined in the code:
http://localhost:8080/api/employee/assignEmployeeToProject/2Then inspect the audit log in the console:
And mapping was created successfully. Here is the EMPLOYEE_PROJECT_MAPPING table from the database:
👉 Get Employee details
We will call this URL to get the employee details along their project - We have passed the employee id (value is 8):
http://localhost:8080/api/employee/getEmployee/8Here is the audit log of the console:
So we obtained information about a specific employee as well as information about his or her project. It's also worth noting that the second Hibernate query - join table, EMPLOYEE_PROJECT_MAPPING, is used to retrieve project information.
👉 Create a Project for Employee
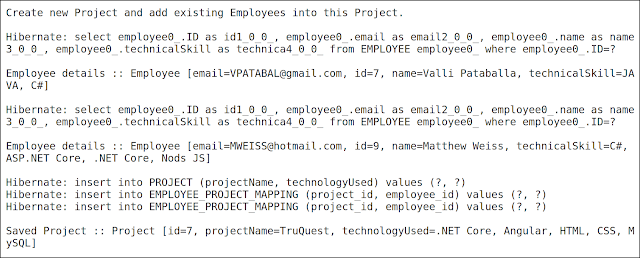
We will use this REST API to create a new Project and add some existing employees to it:
http://localhost:8080/api/project/createProjectForEmployeesLet us see the audit log:
Here is the project table from the database:
👉 Get Project details
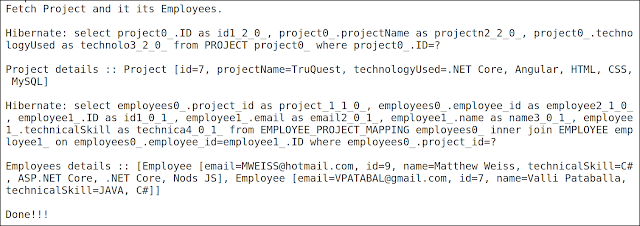
Using this REST API, we will now retrieve an existing project as well as its employee information:
http://localhost:8080/api/project/getProject/7Here is the audit log from the console:
The second Hibernate query - join table (EMPLOYEE_PROJECT_MAPPING) is used to retrieve employee information.
9. Conclusion
So, This is a basic overview of how to set up a Many-To-Many relationship in Spring Boot using JPA and Hibernate. Depending on the requirements of your application, you may need to customize and extend these concepts.
You can download the
source code.
Happy coding!!! 😊












No comments:
Post a Comment